


Pressure Relief Procedure
311911C 7
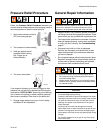
Pressure Relief Procedure
Follow this Pressure Relief Procedure whenever you
are instructed to relieve pressure, stop spraying, check or
service equipment or install or clean spray tip.
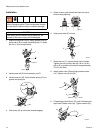
1. Set function selection switch to
OFF and unplug sprayer.
2. Turn pressure to lowest setting.
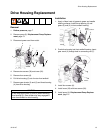
3. Hold gun against side of
grounded metal flushing
pail. Trigger gun to
relieve pressure.
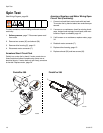
4. Turn prime valve down.
If you suspect the spray tip or hose is clogged or that
pressure has not been fully relieved after following the
steps above, VERY SLOWLY loosen tip guard retaining
nut or hose end coupling to relieve pressure gradually,
then loosen completely. Clear hose or tip obstruction.
5. Engage trigger safety lock on gun if unit is being
shut down or left unattended.
General Repair Information
• Keep all screws, nuts, washers, gaskets, and electri-
cal fittings removed during repair procedures. These
parts usually are not provided with replacement kits.
• Test repairs after problems are corrected. If sprayer
does not operate properly, review repair procedure
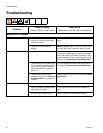
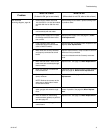
to verify you did it correctly. See Troubleshooting,
page 8.
• Overspray may build up in the air passages.
Remove any overspray and residue from air pas-
sages and openings in the enclosures whenever
you service sprayer.
• Do not operate sprayer without motor shroud in place.
Replace if damaged. Motor shroud directs cooling air
around motor to prevent overheating and insulates
control board from accidental electric shock.
ti8798a
ti9270a
ti2719a
Flammable materials spilled on hot, bare, motor could
cause fire or explosion. To reduce risk of burns, fire or
explosion, do not operate sprayer with cover removed.
To reduce risk of serious injury, including electric shock:
• Do not touch moving or electric parts with fingers or
tools while testing repair.
• Unplug sprayer when power is not required for testing.
• Install all covers, gaskets, screws and washers before
you operate sprayer.
CAUTION
• Do not run sprayer dry for more than 30 seconds. Doing
so could damage pump packings.
• Protect the internal drive parts of this sprayer from water.
Openings in the cover allow for air cooling of the mechan-
ical parts and electronics inside. If water gets in these
openings, the sprayer could malfunction or be perma-
nently damaged.
• Prevent pump corrosion and damage from freezing.
Never leave water or water-base paint in sprayer in cold
weather. Freezing fluids can seriously damage sprayer.
Store sprayer with Pump Armor to protect sprayer during
storage.
• Do not allow material to dry on gun air cap. Poor spray
finish could result.