


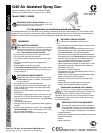

2 311937E
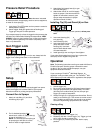
Pressure Relief Procedure
Follow this Pressure Relief Procedure whenever instructed
to relieve pressure, stop spraying, check or service equipment,
or install or clean spray tip.
1. Lock trigger. Turn OFF power and turn pressure control to
lowest pressure setting.
2. Unlock trigger. Hold gun against side of flushing pail.
Trigger gun into pail to relieve pressure.
If you suspect spray tip or hose is clogged or that pressure has
not been fully relieved after following the steps above, VERY
SLOWLY loosen tip guard retaining nut or hose end coupling
to relieve pressure gradually, then loosen completely. Clear
hose or tip obstruction.
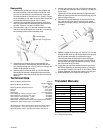
Gun Trigger Lock
To prevent injury when the gun is not in use, always lock the
trigger if unit is being shut down or left unattended.
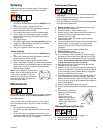
Setup
Make sure sprayer is turned off and unplugged from power
source and trigger lock is locked. Refer to your sprayer
instruction manual for priming and spray instructions.
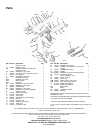
Connect Gun to Sprayer
1. Attach air inlet fitting (17) and fluid
inlet fitting (25) to gun.
2. For Air-Assisted spraying, first
attach black, coiled, air supply hose (a)
to gun air inlet fitting (17).
NOTE: The first time you set up the gun
for spraying you will have to cut the
black air hose to length desired.
3. Attach blue fluid supply hose (b) to gun
fluid inlet fitting(25).
4. Attach other end of air and fluid supply
hoses to sprayer. Use two wrenches to
tighten all connections securely (see
sprayer setup instructions in sprayer
operation manual 311905.)
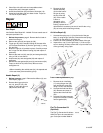
Installing Tip (33) and Guard (6) on Gun
1. If equipment has recently been operated, relieve pres-
sure.
2. Insert seat housing (35)
into guard (6).
3. Insert SwitchTip (33).
4. Insert seal (33b) over seat
(35a) and insert in seat
housing (25). Use black
seal for water-based materials and orange for solvent and
oil-based materials.
5. Install guard (6) over end of gun. Hand tighten.
If you notice fluid leaking from front of gun, replace the
seat (33a) and/or retighten the guard nut.
Operation
Note: The following instructions are for guns used with Graco’s
FinishPro Sprayers. See the sprayer instruction manual
311905. If you are using a different sprayer, see your
equipment instruction manual.
If you are using a FinishPro
™
390 Model Sprayer, air
regulation is only provided at the gun. The FinishPro
™
395
Model Sprayers provide additional air regulation at the sprayer.
1. Unlock trigger (1a).
2. Be sure the arrow shaped tip (33) faces forward (spray).
3. Hold gun perpendicular and approximately 12-inches
(304 mm) from surface. Move gun first, then pull gun
trigger (3) to spray a test pattern.
4. Always hold gun at a right angle from the surface. Do not
make an arc with the gun. This causes an uneven coat of
fluid. To obtain an even finish, use smooth, even strokes
across the object being sprayed with a 50% overlap.
Clearing a Clog
1. Relieve pressure. Lock trigger (1a).
2. Rotate tip (33) 180°. Unlock trigger (1a). Trigger gun into
pail or onto ground to remove clog.
3. Lock trigger (1a). Rotate tip (33) 180° back to spray
position.
Trigger Locked
Trigger Unlocked
ti6581a ti6582a
(spray)
(no spray)
17
25
ti9444a
a
17
ti9022a
b
25
33a
6
33
35
33b
ti8249a