


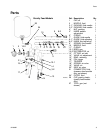

Operation
312388K 5
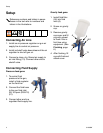
Operation
Pressure Relief Procedure
1. Turn off air and fluid supply.
2. Hold a metal part of the gun firmly to
a grounded metal pail. Trigger the gun
to relieve pressure.
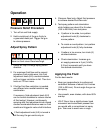
Adjust Spray Pattern
1. Rotate air cap to change spray pattern
direction.
2. For maximum fluid flow and to prevent
premature fluid nozzle wear, turn fluid
adjustment knob (8-2) counterclockwise
until no trigger restriction is felt. Then turn
knob out 1/2 turn more.
3. If further fluid flow restriction is needed,
use different size needle/nozzle/air cap
combination.
If necessary, fluid adjustment knob (8-2)
can be turned clockwise to reduce volume
of fluid output. However, continuously
spraying with fluid adjustment knob closed
causes accelerated abrasive wear on fluid
needle and trigger/air valve shaft interface.
4. Pressure Feed only: Adjust fluid pressure
to achieve desired fluid flow rate.
5. Test spray pattern and atomization
while holding gun about 6 to 8 inches
(150 to 200 mm) from test piece.
a. If pattern is too wide, turn pattern
adjustment knob (5) clockwise to
narrow pattern.
b. To create a round pattern, turn pattern
adjustment knob (5) fully clockwise.
c. If pattern is too narrow, turn knob (5)
counterclockwise.
d. Check atomization. Increase gun
air supply pressure in 5 psi (34 kPa,
0.3 bar) increments until you have
the desired atomization.
Applying the Fluid
For the best results:
• Keep gun perpendicular to surface and
consistent distance of about 6 to 8 inches
(150 to 200 mm). Do not angle the gun as
you spray.
• Use smooth, even strokes, with about 50%
overlap.
• HVLP Guns: Use a slightly slower hand
movement and make fewer passes than
you would with a conventional air spray
gun. Take care to avoid runs or sags.
Do not exceed maximum working air pressure
shown on front cover. Read warnings.
If fluid adjustment knob (8-2) is turned in
all the way, the gun emits only air.