


4 308237
Installation/Operation
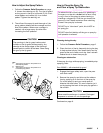
System Requirements.
WARNING
Keep the walletĆsized warning card provided with
this gun with the operator at all times. The card
contains important treatment information should
an injection injury occur. Additional cards are
available at no charge from Graco Inc.
WARNING
Be sure your system has a bleedĆtype master air
valve (pneumatic pumps only) and a pressure
drain valve. These accessories help reduce the
risk of serious bodily injury, including fluid injecĆ
tion, splashing in the eyes or on the skin, or injury
from moving parts, if you are adjusting or repairing
the pump or gun.
1. The bleedĆtype master air valve (airĆpowered
pumps only) relieves air trapped between this
valve and the pump after the air regulator is shut
off. Trapped air can cause the pump to cycle
unexpectedly.
2. The pressure drain valve assists in relieving fluid
pressure in the displacement pump, hose and
gun: triggering the gun to relieve pressure may
not be sufficient.
3. Strain the fluid you are spraying if it contains
particles which could clog the spray tip.
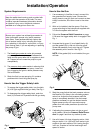
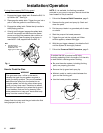
How to Use the Trigger Safety Latch
1. To engage the trigger safety latch, turn the latch
(A) to a right angle with the gun body. See Fig. 1.
2. To disengage the trigger safety latch, push the
latch (A) out and turn it parallel with the gun body.
Fig. 1
ENGAGED
DISENGAGED
01484
How to Use the Gun.
1. If an accessory inĆline filter is used, connect it to
the grounded fluid supply hose. Connect the
supply hose to one gun port and connect an elecĆ
trically conductive, fluid return hose to the other
port.
2. With no tip installed, start the pump. Flush the
pump according to the instructions supplied with
it. Prime the system with the fluid.
3. Follow the Pressure Relief Procedure on page
2. Be sure the trigger safety latch is engaged. See
Fig. 1.
4. Unscrew the tip guard (1) and install the tip (A)
and the gasket (2d) in the nut of the tip guard.
Screw the assembly firmly onto the gun. Tighten
the assembly with a wrench. See Fig. 2.
NOTE: If the gasket (2d) is not installed, the gun
will leak.
Fig. 2
01483
1
A
2d
5. Start the pump.Adjust the back pressure valve or
the RestrictĆAĆFlo valve in the circulating system
return line. Adjust the fluid pressure until the
spray is completely atomized. Use the lowest
pressure necessary to get the desired results.
Higher pressure may not improve the spray
pattern and will cause premature tip wear and
pump wear.
6. If adjusting the pressure does not give a good
spray pattern, follow the Pressure Relief ProceĆ
dure on page 2 and then try another tip size.
7. Use a fullĆopen, fullĆclose triggering action. Hold
the gun about 14 in. (350 mm) from and at right
angles to the work surface. Don't swing the gun
in an arc. Practice to find the best length and
speed of stroke.