


308237 7
Service
CAUTION
Do not attempt to install an old style needle in this
gun. The front of the new needle is marked with a
+ below the Graco symbol.
Notes:
Use Needle Kit 235475.
Use all the new parts for the best results. Parts
included in the kit are shown with one asterisk, (2a*).
Keep parts very clean. Dried paint or other contamiĆ
nants cause friction which causes parts to wear faster.
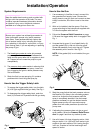
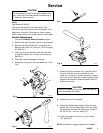
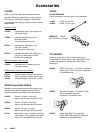
Needle Replacement.
1. Follow the Pressure Relief Procedure, page 2.
2. Remove the hose, tip guard, spray tip and gasket.
3. Remove the diffuser/seat (2a*) and gasket (2b*).
Remove the screw (12), pivot pin (10), and trigger
(8). See Fig. 5.
4. Insert a punch into the rear of the gun and tap it
to push the needle (2c*) out the front of the gun.
See Fig. 6.
5. Clean the internal passages of the gun.
6. Grease the rings (A) of the new needle (2c*). See
Fig. 7.
Fig. 5
2a*
2b*
8
10
12
02355
Fig. 6
2c
02356
Fig. 7
A
Fig. 8
2c
02357
B
7. Slide the rear of the needle (2c*) into the front of
the gun. Slide the tool (B), provided with the
repair kit, into the gun, around the needle. Lightly
tap the tool with a hammer or lightly press the tool
against a flat surface to seat the needle. See Fig.
8. Remove the tool.
CAUTION
Tapping or pressing the tool too hard may jam the
tool and damage the needle.
8. Grease the end of the needle.
9. Grease the diffuser/seat threads. Place the new
gasket (2b*) on the diffuser/seat (2a*) and screw
the assembly into the fluid housing (6). Torque to
20-25 ftĆlb (27-34 N.m). See Fig. 5.
10. Install the trigger (8), pivot pin (10) and screw
(12). See Fig. 5.
NOTE: No needle or trigger adjustment is needed.