


Operation
v.
Production Spraying
You are now ready for production spraying. If you stop
spraying for more than 30 minutes, turn off the heater
to prevent overheating the fluid.
VI. Shutting Down the System
Shut down the system at the end of the work shift and
before checking, adjusting, cleaning, or repairing the
system. Always follow the Pressure Reiief Procedure
on page 8.
When to Flush
Before the first use
When changing colors
Before fluid can dry or settle out in a dormant
system
Before storing the system
Flushing
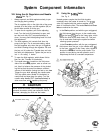
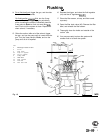
II. How to Flush
See Fig. 10.
you flush, be sure the heater is turned off
and the fluid has cooled. This is to reduce the risk
of a fire or explosion and serious injury.
1.
Turn off the heater (3), and allow the system to
cool.
2.
Remove the air cap from the gun, and clean sepa-
rately. Do not reinstall at this time.
3.
Open the filter drain valve (48). Unscrew the fluid
filter (45) bowl. Remove the screen. See manual
‘307-273. Reinstall the bowl without the screen.
4.
Hook the drain hose (13) on the waste pail.
5.
Turn the 3-way valve (9) to Drain.
6.
Turn the needle valve (5) all the way out
(counterclockwise).
7.
Put the suction tube (15) in a grounded pail with
about 1 gallon (4 liter) of a compatible solvent.
8.
Make sure the air regulators (6a,6b) and master air
valves (A) are closed.
NOTE: The gun air regulator (6b) always stays closed
during flushing.
9.
Make sure the fluid regulator (44) is open (turned
in) to allow fluid flow.
10. Connect the air line (C) to the pump.
11. Open the master air valves (A).
.
12. Slowly open the pump air regulator (6b) until the
pump starts.
13. Hold the gun against a grounded metal waste pail.
Trigger the gun slowly. The gun will emit air until
the fluid arrives. When solvent appears, release
the trigger.
10
308-448