


Repair
313889B 13
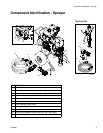
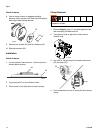
Pinion Assembly / Clutch Armature / Clamp
Pinion Assembly / Clutch Armature
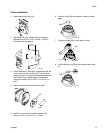
Removal
If pinion assembly (29) is not removed from clutch hous-
ing (19), perform steps 1 through 3. Otherwise, start at
step 4.
Pinion Assembly
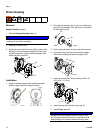
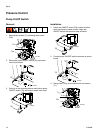
1. Remove drive housing, page 12.
2. Disconnect clutch cable connectors from inside of
pressure control:
a. Remove two screws (71) and swing down cover
(70a).
b. Disconnect engine leads from board to engine.
c. Remove strain reliefs (70b).
3. Remove four screws (36), washers (37), and pinion
assembly (29).
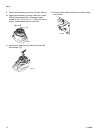
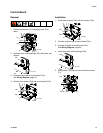
4. Place pinion assembly (29) on bench with rotor side
up.
5. Remove four screws (28) and lock washers (24).
Install two screws in threaded holes (E) in rotor.
Alternately tighten screws until rotor comes off.
6. Remove retaining ring (29b).
7. Turn pinion assembly over and tap pinion shaft
(29a) out with plastic mallet.
ti13712a
ti13356a
ti13709a
71
70a
ti13703a
ti13710a
ti13711a
36
19
37
ti5481a
28
24
E
29
ti13215a
ti5482a
29b
29a