11310548
Hydraulic Motor Yoke
Removal
1.
Relieve pressure; page 5.
2. Place drip pan or rags under sprayer to catch
hydraulic oil that leaks out during repair .
3. Remove pump pin (21) and retainer clip (120),
page 14.
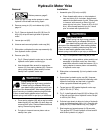
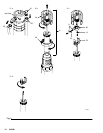
4. Fig. 5. Remove hydraulic lines (93, 95) from fit-
tings (16) at top left and right side of hydraulic
motor.
5. Loosen jam nut (65).
6. Unscrew and remove hydraulic motor cap (64).
7. Slide piston rod/hydraulic mo tor cap assembly (A)
from hydraulic motor cylinder.
8. Remove yoke (78).
a. Fig. 5. Clamp hydraulic motor cap in vi se with
hydraulic motor piston rod facing up.
b. Use shortened Allen wrench to remove two
screws (13) from spring retainer (83). Remove
yoke, spring retainer, piston and trip rod as-
sembly from hydraulic motor cap.
WARNING
Flying Parts Hazard
Detent spring has high energy potential.
If detent spring is released without due
care detent spring and balls could fly into
the eyes of the disassembler. Wear safety glasses
when removing or installing detent spring and balls.
Failure to wear safety glasses when removing
detent spring could result in eye injury or blindness.
c. Cover spring retainer (83) with a rag to contain
detent spring (20) and balls (8) when they are
remove d from yoke. Remove detent balls and
spring. Remove spring retainer.
d. Put yoke in vise and remove piston rod as-
sembly from yoke.
Installation
1. Assemble yoke (78) to trip rod (60).
a. Clean threads with primer or chlorinated sol-
vent and let dry 3 to 4 minutes. Apply thread
sealant to female threads of yo ke. Clamp yoke
in vise and, with wrench on flats of trip rod,
screw trip ro d into yoke. Torque to 55 in-lb (6.2
N·m). Allow thread sealant to dry for 3 hours
prior to contact with hydraulic fluid.
WARNING
Flying Parts Hazard
Detent spring has high energy potential.
If detent spring is released without due
care detent spring and balls could fly into
the eyes of the disassembler. Wear safety glasses
when removing or installing detent spring and balls.
Failure to wear safety glasses when removing
detent spring could result in eye injury or blindness.
b. Fig. 5. Put hydraulic moto r cap (64) in vise.
c. Install yoke, spring retainer, piston and trip rod
assemb ly in hydraulic moto r cap. Use short-
ened Allen wrench to insta ll two screws (13) in
spring retainer to secure piston rod assembly
to hydraulic motor cap.
2. Slide pisto n rod asse mbly (A) into hydraulic motor
cylinder.
3. Scre w down hydraulic motor cap (64). Unscrew
hydraulic motor cap until inlet and outlet align with
hydraulic line fittings and test hole in hyd raulic
moto r cap points toward belt guard (117) .
4. Torque jam nut (65) against hydraulic motor cap
(64) to 150 ft-lb (17 N·m).
5. Fig. 5. Install hydraulic lines (93, 95) to fittings (16)
to top left and right side of hydraulic motor; torque
to 40 ft-lb (54.2 N·m).
6. Pull start rope slowly to align pin holes of hydraulic
motor and displacement pump (111). Connect with
pump pin (21); insta ll retainer clip (120), page 14.
7. Start engine and operate pump for 30 seconds.
T urn engine OFF. Check hydraulic oil level and fill
with Graco hydraulic oil, page 5.


