


308813 17
Service
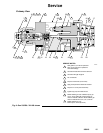
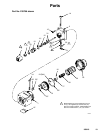
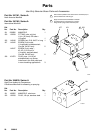
Reassembly
1. Perform the following applicable step:
D Non-circulating Paint Guns: Lubricate the back-
up (6{) and o-ring (5{) and install them on the
fluid outlet port plug (4). Install the plug in the
fluid outlet port of the fluid housing (2). See
Fig. 9.
D Circulating Paint Guns: Reinstall the filter (32)
in the fluid inlet port and the gasket (3) in the
fluid housing (2).
D Sealant Gun: Reinstall gasket (3).
2. Install the o-rings (22*, 23*) on the piston (21).
Install two o-rings (25*, 26*) on each of the piston
stems (T). Lubricate all the o-rings, the piston, and
the piston stems.
3. Insert the piston (21) into the piston housing (1).
4. Remove the protective paper from the sticky side
of the gasket (13*) and adhere the gasket to the
bottom of the piston housing (1), making sure the
three holes in the gasket are properly aligned with
the matching holes in the housing.
5. Install the fluid housing (2) on the piston housing
(1). Torque the four screws (15) to 65 in-lb (7.3
NSm).
CAUTION
Install a new gasket (11{) whenever you remove the
seat (10) from the gun. Failure to install a new gas-
ket may result in fluid leaking into the air chamber.
6. Install the o-rings (31) on the fluid needle assem-
bly (12). Lubricate with light weight oil.
CAUTION
Be sure to keep the needle straight when installing it
in the piston housing. If the needle is bent it must be
replaced.
7. Insert the needle assembly (12) into the front of
the fluid housing (2). Push it straight back through
the piston.
8. Install a new gasket (11{) in the fluid housing (2).
9. Lubricate the threads of the seat (10). Screw it into
the fluid housing (2) and torque to 20–25 ft-lb
(27–34 NSm).
10. Install the needle stop (17) on the needle. Coat the
setscrew (16) with semi-permanent anaerobic
sealant and install the screw into the needle stop.
Torque to 4–5 in-lb (0.45–0.56 NSm). Pull on the
needle to make sure it seats fully.
11. Install the springs (19, 20).
12. Lubricate the threads of the piston housing (1).
Screw the cap (18) onto the housing until it bot-
toms out.
13. Do not lubricate the gasket (8). Install the spray
tip (9) and gasket (8) in the tip retainer nut (7).
Screw the assembly firmly onto the gun. Tighten
the assembly with a wrench, but do not exceed
5 ft–lb (6.8 NSm) for model 233670 gun.
14. Reinstall the gun on the manifold with the four
screws (14). Torque to 65 in-lb (7.3 NSm).