


2 311977C
Pressure Relief Procedure
Follow this Pressure Relief Procedure
whenever instructed to relieve pressure,
stop spraying, check or service equipment,
or install or clean spray tip.
1. Turn OFF power and turn sprayer pressure control to low-
est pressure setting.
2. Hold gun against side of grounded metal flushing pail.
Trigger gun into pail to relieve pressure.
If you suspect spray tip or hose is clogged or that pressure has
not been fully relieved after following the steps above, VERY
SLOWLY loosen tip guard retaining nut or hose end coupling
to relieve pressure gradually, then loosen completely. Clear
hose or tip obstruction.
Gun Trigger Lock
To prevent injury when the gun is not in use, always
set the gun’s trigger lock if unit is being shut down or
left unattended.
Setup
Make sure sprayer is turned off and unplugged from power
source. Refer to your sprayer instruction manual for priming
and spray instructions.
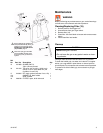
Connect Gun to Sprayer
1. Attach supply hose to sprayer fluid outlet.
2. Attach other end of supply hose to gun's bottom fitting.
Use two wrenches (one on the bottom fitting and one on
the hose), to tighten all connections securely.
3. Refer to sprayer instruction manual for priming
instructions.
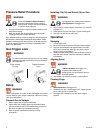
Installing Tip (16) and Guard (15) on Gun
1.If equipment has recently been operated,
relieve pressure. Set trigger lock.
2. Using a pencil or similar object, insert seat (17) into back
of guard (15).
3. Install guard (15) over end of gun. Tighten retaining nut.
4. Insert tip (16) into slot on guard (15).
Operation
Spraying
1. Unlock trigger lock.
2. Be sure the arrow shaped tip (16) faces forward (spray).
3. Hold gun perpendicular and approximately 12-inches
(304 mm) from surface. Move gun first, then pull gun
trigger to spray a test pattern.
4. Slowly increase pump pressure until coverage is uniform
and even (see sprayer instruction manual for additional
information).
Aligning Spray
1.Relieve pressure. Set trigger lock.
2.Loosen guard retaining nut.
3.Align guard (15) horizontally to spray a
horizontal pattern.
4. Align guard (15) vertically to spray a vertical pattern.
Clearing Clogs
1. Relieve pressure. Set trigger lock.
2. Rotate tip (16) 180°. Unlock trigger lock. Trigger gun into
pail or onto ground to remove clog.
3. Set trigger lock. Rotate tip (16) 180° back to spray
position.
WARNING
WARNING
WARNING
Trigger Locked
(no spray)
Trigger Unlocked
(spray)
ti8923a
ti8922a
WARNING
WARNING
WARNING