


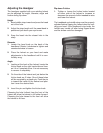


Adjusting the Headgear
The headgear supplied with your welding helmet
can be adjusted for height, diameter, angle and
friction during flip-down.
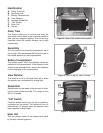
Height
1. Bend middle strap inward and press the bead
out of the hole.
2. Adjust the strap length until the sweat band is
positioned just above your eye brows.
3. Snap the bead into the closest hole in the
strap.
Diameter
1. Locate the hand knob on the back of the
headband. Rotate it clockwise to tighten and
counterclockwise to loosen.
2. Place the helmet on your head and make
adjustments to the headband until it is com-
fortably snug.
Angle
1. Looking at the back of the helmet, locate the
friction knob on the right hand side and loos-
en it 4 or 5 complete turns. It is not necessary
to remove it completely.
2. On the side of the helmet and just below the
friction knob are 3 holes. One of these holes
will be occupied by a plastic pin. Push the pin
in toward the inside of the helmet and posi-
tion it over the desired hole.
3. Insert the pin and tighten the friction knob.
Choosing the hole furthest from the front of the
helmet will allow the helmet to tilt further forward.
Choosing the hole closest to the front will allow
the helmet to tilt less.
Flip-down Friction
1. Tighten or loosen the friction knobs located
on either side of the helmet to increase or
decrease the amount of effort needed to raise
and lower the helmet.
The headband and middle strap must be properly
adjusted before fl ipping the helmet down by nod-
ding your head. If the headband is too loose, the
helmet may tumble off after being fl ipped down
and the lenses could be damaged.
Figure 1. Model H7786.