


Variable Shade
The shade chart below shows settings that can
be used for various welding processes. We rec
-
ommend that you start ANY welding process at
#12 or #13 and reduce the shade as needed for
safety.
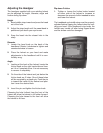
"ON" Switch
Push the "ON" button on the side of the helmet.
The auto darkening feature will activate and stay
active for 15 minutes after the last bright light.
You will need to push the button again when this
occurs. Before welding raise the helmet up to a
bright light source and make sure the auto dark-
ening feature activates. If it does not, push the
button and check again. If it still does not work
see the troubleshooting guide at the end of this
instruction sheet.
Operation
Welding App. Current Amp. Shade No.
Stick Welding
<40
40-80
80-175
175-300
300-500
#9
#10
#11
#12
#13
MIG
(metal inert
gas)
<100
100-175
175-300
300-500
#10
#11
#12
#13
TIG
(tungsten inert
gas)
<50
50-100
100-200
200-400
#10
#11
#12
#13
Air Carbon
Arc
<500
500-700
#12
#13
Plasma
Cutting
60-150
150-250
250-400
#11
#12
#13
Plasma
Welding
<50
50-200
200-400
#9
#10
#11
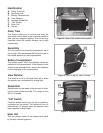
Sensitivity Dial
As previously mentioned, the auto darkening
lense can be made more sensitive or less sensi
-
tive to bright light produced by welding. In most
applications, the dial should be set to middle of its
range. However, the setting should be changed
when used in extreme conditions. Below is a list
of applications and settings that you can use as a
guide for making adjustments.
Stick Welding Mid Sensitivity
MIG Welding
(short circuit)
Low-Mid Sensitivity
MIG Welding
(pulsed or spray)
Mid Sensitivity
TIG Welding Mid-High Sensitivity
Plasma Cutting/
Welding
Low-Mid Sensitivity