


G1140 Edge Sander -9-
Beginning Assembly
Assembly of the G1140 is straightforward. We
have organized the assembly process into steps.
Please follow them in sequence.
Tools Required: Only a few common tools are
needed to assemble this machine. Specifically, a
6" adjustable wrench, 12mm open end wrench,
regular and Phillips
®
screwdriver and an 8mm
Allen
®
wrench.
SECTION 4: ASSEMBLY
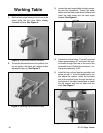
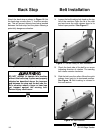
Figure 3. Installing the feet.
Feet
1. Carefully lay the machine over on its side.
Have someone assist you when doing this.
Do not attempt to lay the machine over by
yourself.
2. Install the four feet using the 10-24 x
3
⁄4''
Phillips
®
Head Screws provided. Figure 3.
Get assistance and upright the machine.
This machine is very heavy and can be awk-
ward to handle without help. Get assistance
during periods of assembly which require
that the machine or any of its major compo-
nents be moved, tilted, or carried. Failure to
use proper lifting techniques could result in
serious injury or damage to the machine.
All die-cut metal parts have a sharp edge
(called “flashing”) on them after they are
formed. This is generally removed at the
factory. Sometimes a bit of flashing might
escape inspection, and the sharp edge can
cause cuts or lacerations when handled.
Please examine the edges of all die-cut
metal parts and file or sand the edge to
remove the flashing before handling them.
Serious injury may occur.