


G1140 Edge Sander -11-
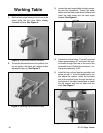
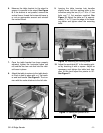
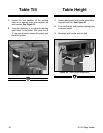
Figure 8. Checking table bracket for parallelism.
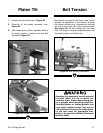
Figure 9. Table trunnions installed.
6. Measure the table bracket to the stand to
assure it is parallel to the stand. See Figure
8. If the bracket is not parallel, remove the
vertical brace, thread the horizontal brace in
or out an appropriate amount and reinstall
the vertical brace.
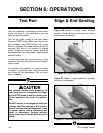
Figure 10. Attaching the working table.
9. Leaving the table trunnion lock handles
slightly loose, bolt the working table to the
trunnions using the two (2)
5
⁄
16''-18 x
3
⁄
4'' hex
bolts and
5
⁄
16'' flat washers supplied. See
Figure 10. Adjust the table so it is approxi-
mately
1
⁄
8'' to
3
⁄
16'' from the edge of the sand-
ing platen and tighten down the mounting
bolts.
Figure 11. Setting the pointer to 90˚.
10. Adjust the work table 90˚ to the sanding plat-
en by checking it with a square. Adjust as
necessary and tighten the table lock han-
dles. At this time adjust the pointer to 90˚.
See Figure 11.
7. Once the table bracket has been properly
adjusted, tighten the horizontal brace jam
nut and the two hex nuts that hold the verti-
cal brace in place.
8. Attach the table trunnions to the table brack-
et. Each is held in place with a
3
/8'' flat wash-
er and lock handle. See Figure 9. The trun-
nion with the scale attaches to the left side.