


<%+,,')EaVcZg$HVcYZg
"&."
Sanding Belt
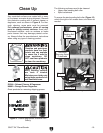
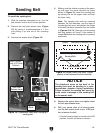
To install the sanding belt:
1. L^i]i]ZbVX]^cZXdccZXiZYidV^g!ijgci]Z
WZaiiZch^dc`cdWidi]Z.dXadX`edh^i^dc#
2. GZbdkZi]ZadX`edhigZaZVhZaZkZgFigure
18 Wn ijgc^c\ ^iXdjciZgXadX`l^hZ V
&
¿' ijgc
VcY ejaa^c\ ^i je VcY dji d[ i]Z bdjci^c\
]daZ#
3. GZbdkZi]ZheVXZgWadX`Figure 18#
4. BV`^c\hjgZi]ZgdiVi^dcVggdlhdci]ZhVcY"
^c\ WZai ed^ci i]Z hVbZ Y^gZXi^dc Vh i]dhZ
h]dlc^cFigure 18!^chiVaai]ZhVcY^c\WZai
WnhiVgi^c\[^ghidci]ZjeeZggdaaZgVcYi]Zc
i]ZadlZggdaaZg#
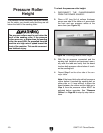
Note: The sanding belt must be centered
between the limit switches, and the edge of
the sanding belt must be between the tongs
of the belt oscillation controller fork, as shown
in Figures 18 & 19. Damage to the sanding
belt and sander will occur if the sander is
turned ON before the sanding belt is correctly
positioned.
5. GZeaVXZi]ZheVXZg WadX`VcYi^\]iZcYdlc
i]ZadX`edhigZaZVhZaZkZg#
6. L^i] ndjg ]VcYh XaZVg d[ Vaa bdk^c\ eVgih!
ijgci]ZWZaiiZch^dc`cdWidi]Z&'/%%edh^"
i^dcidiZch^dci]ZWZai#
·>[i]ZWZaiiZch^dc`cdW^hijgcZYidi]Z./%%
edh^i^dc!i]ZWZail^aa]VkZcdiZch^dc#
NOTICE
The directional arrow on the back of the
sanding belt must be pointing in a coun-
terclockwise direction during installation.
Failure to install the sanding belt correctly
could result in damage to the sanding belt
or the sander itself.
Figure 19. HVcYZgdjia^cZidek^Zl#EgdeZg
edh^i^dcd[WZaiWZilZZci]Za^b^ihl^iX]Zh#
HVcY^c\7Zai
7VX`
;gdci
DhX^aaVi^dc8dcigdaaZg;dg`
A^b^iHl^iX]Zh
Figure 18. 8dbedcZcihjhZYl]ZcX]Vc\^c\V
hVcY^c\WZai#
HeVXZg
7adX`
GDI6I>DC
AdX`Edhi
GZaZVhZAZkZg
7Zai8ZciZgZY
>c;dg`
7ZaiIZch^dc
@cdW.D8adX`
Edh^i^dc