


-10- G1017 12'' Portable Planer
SECTION 4: ASSEMBLY
Wooden Base
The wooden base yields greater stability and
enables the planer to be fastened to a sturdy
bench or floor when planing long stock. To con-
struct the wooden base pieces:
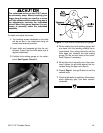
1. Mill two pieces of wood 17'' (L) x 2'' (W) x 2''
(H). Do not use planer for constructing base
pieces until it is checked out and adjust-
ments have been made as required.
2. Layout the two planer mounting hole loca-
tions on each piece.
3. Predrill mounting holes and mount the plan-
er using four
5
⁄16'' lag bolts and washers pro-
vided. See Figure 3.
Alternatively, the planer can be directly mounted
to a bench or table top, or to a Shop Fox
®
Deluxe
Tool Table utilizing these same mounting holes,
using the appropriate fasteners.
Figure 3. Mounting planer to wooden base.
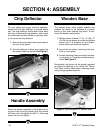
Chip Deflector
Handle Assembly
For your safety and proper machine operation,
ensure that the chip deflector is secured before
use. The chip deflector directs wood chips away
from the cutterhead during operation and covers
the cutterhead and feed rollers for operator safe-
ty. To secure the chip deflector:
1. Remove the two socket head cap screws at
the rear of the planer.
2. Set chip deflector in place and replace the
two socket head cap screws. See Figure 2.
Figure 2. Chip deflector mounting screws.
Attach the handle assembly to the shaft protrud-
ing out of the top of the planer. Align the handle
with the notch, and tighten the M6-1 x 10mm cap
screw. Do not over tighten.