


-16- G1017 12'' Portable Planer
SECTION 7: OPERATIONS
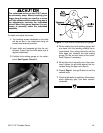
Once assembly is complete and adjustments are
done to your satisfaction, you are ready to test the
machine. Make certain you have removed any
tools or gauges used in the adjustment or assem-
bly process from the bed of the planer.
Turn on the power supply at the main panel.
Press the ON button. Make sure that your finger
is poised on the OFF button, just in case there’s
a problem. The planer should run smoothly, with
little or no vibration or rubbing noises. Strange or
unnatural noises should be investigated and cor-
rected before operating the machine further.
If you cannot easily locate the source of an
unusual noise or vibration, feel free to contact our
service department for help.
Test Run
• Inspect your lumber for twist or cup and sur-
face one face on a jointer if necessary.
• Scrape all glue off when planing laminated
stock.
• Plane boards of equal thicknesses when
planing multiples.
• Remove only
1
⁄32'' to
1
⁄16'' (.8mm to 1.6mm) of
material on each pass. Remove less materi-
al in each pass when planing wide or dense
stock.
• Support lumber on both ends. Get assistance
if planing long lumber, or use roller stands.
• Measure workpiece with calipers to get exact
results.
• Check surface of workpiece for any irregular-
ities.
• Plane equal amounts on each side of the
board to reduce the chance of warpage.
• Use entire width of planer to wear knives
evenly.
• Surface wood with the grain. Never feed any
end cut or end grained wood through the
machine.
Planing Tips
Make sure the G1017 is unplugged or dis-
connected from the power source and mov-
ing parts have come to a complete stop
before investigating any problems or per-
forming any maintenance or adjustments.
Serious personal injury may occur.