


-18- Model G1019Z 14" Bandsaw
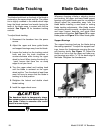
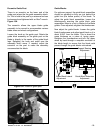
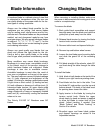
Figure 15. Upper blade guide assembly.
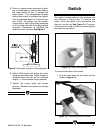
Blade Tracking
The bandsaw blade is dangerously sharp.
Use extreme caution when working near the
saw blade. Failure to exercise care could
result in severe injury.
Whenever changing a blade or adjusting tension
and tracking, the upper and lower blade support
bearings and guide blocks must be re-adjusted.
Always adjust the assemblies away from the
blade before installing a new blade or making
blade tracking adjustments. After blade tension
and tracking are set correctly, re-adjust the upper
and lower support bearings and guide block
assemblies into position. See Figure 15 for upper
blade guide and Figure 16 for lower blade guide.
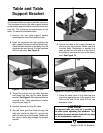
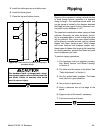
Support Bearings
The support bearings back-up the blade during
the sawing operation. To adjust the support bear-
ings, loosen the thumbscrews securing the sup-
port bearing shafts. See Figure 17. Adjust the
shafts in or out so that the upper and lower sup-
port bearings are within
1
/64" of the back edge of
the blade. Retighten the thumbscrews.
Blade Guides
The blade should track so the body of the blade is
centered on the upper wheel and tire. The rubber
tire is slightly crowned in the middle which helps
keep the blade centered and avoids having the
teeth of the blade come in contact with the tire
material. See Figure 13 for bandsaw tracking
controls.
To adjust blade tracking:
1. Disconnect the bandsaw from the power
source.
2. Adjust the upper and lower guide blocks
and support bearings away from the blade.
3. Loosen the locknut on the tracking control
knob and turn the knob clockwise or
counter-clockwise while turning the upper
wheel by hand. When turning the wheel by
hand, ensure that there are no sharp
edges to cut your hand.
4. Turn the upper wheel and tracking knob
until the blade is centered on the upper
wheel and tire. Turn the wheel at least three
more full turns to ensure that the blade is
tracking in its final position.
5. Retighten the locknut and double check
blade tracking.
6. Install the upper wheel cover.