


G1183/1276 Combination Sander -19-
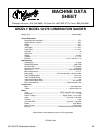
Bevel Sanding
When bevel sanding, be sure to re-position the
work table so it is at a maximum of
1
/16" away from
the disc or belt.
1. Hold workpiece against miter gauge to
keep piece square to the disc or belt.
2. Move workpiece against sanding surface
width to ensure even abrasion. Use even,
but firm, pressure.
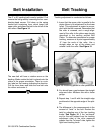
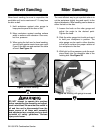
3. When using the belt arm for bevel sanding,
you will have greater control over your work
if you tilt the belt arm and maintain the table
at level. See Figure 19.
Figure 19. Bevel sanding.
DO NOT attempt to operate this machine
before completing the assembly and adjust-
ment instructions. Be sure that the switch is
off and the cord is disconnected from the
power source at all times until assembly
and adjustment are complete and you have
reviewed all safety guidelines. Serious
injury could occur.
Miter Sanding
The most efficient way to get a perfect miter is to
cut the workpiece slightly long and sand it to the
desired dimension. Miter sanding can be done on
either the belt or the disc.
1. Loosen the knob on the miter gauge and
adjust the angle to the desired point.
Tighten the knob.
2. Slide the miter gauge into its slot and use it
to hold your workpiece in position. The
miter gauge can be used in either direction
in the slot to achieve the proper relation of
the workpiece to the disc.
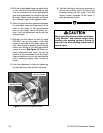
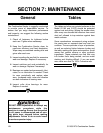
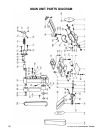
3. With light, but firm pressure, push the work-
piece slowly into the downspin side of the
rotating disc. See Figure 20.
Figure 20. Mitering with gauge reversed.
Rotation