


Model G5354 Airbrush -11-
SECTION 6: MAINTENANCE
Cleaning
Proper cleaning is the best way to ensure
trouble free performance from your air-
brush. If your airbrush is not thoroughly
cleaned, damage and poor spraying will
result. Problems caused by improper clean-
ing will not be covered by the warranty.
Keep in mind that your cleaning solution
must be of the same base as the paint.
In other words, use water to clean water-
based paints and thinner/solvent to clean
oil based paints.
Clean the airbrush immediately after each
use. Paint dries quickly. A spare jar is
included with your airbrush so that you can
always keep cleaning material on hand to
quickly clean the airbrush if you are going
to stop using it for longer than a minute.
Use the included dropper to inject a small
amount of cleaning fluid into the siphon
tube, then spray it out and repeat the pro-
cess until no paint comes out.
When you are finished using your airbrush
for the day, do a full breakdown and clean-
ing job.
To do a full cleaning job:
1. Spray cleaning liquid through the air-
brush until the spray is clean and free
of any paint.
2. DISCONNECT AIRBRUSH FROM
COMPRESSED AIR!
3. Remove the paint container (jar or
metal cup) and the air hose.
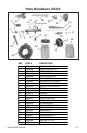
4. Disassemble the airbrush components
as shown on the parts breakdown,
located on Page 13.
5. Clean the components in a glass or
plastic container with the appropriate
cleaning solution. Avoid submerging
the entire gun and keep O-rings
away from solvent as much as pos-
sible when cleaning.
6. Dry all parts with a lint free cloth.
7. Coat the needle with a layer of needle
lubricant or mineral oil.
8. Reassemble the airbrush. Place a
piece of tape on the top of the trig-
ger plate spring to prevent it from
falling out until the airbrush is fully
assembled. Make sure the bottom of
the trigger fits on top of the valve stem
assembly. Insert the needle all the way
to the spray regulator until it stops.
Needle Refurbishing
The needle tip is very delicate and can
become "hooked" or bent if it gets bumped
during cleaning. If this happens, a replace-
ment needle can be purchased, or you can
refurbish your existing needle.
A popular way to refurbish the needle is
with a fish hook sharpening stone that can
be purchased where fishing supplies are
sold. These stones are very fine and make
it easy to re-establish a fine point.
After using the stone, the needle can be
placed in a drill press, drill or Dremel®,
then polished successively with 1200,
1500, and 2000 grit wet sandpaper, then
polished with beeswax.