G8749 Drum/Flap Sander
-21-
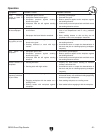
Operation
Symptom Possible Cause Possible Solution
Deep sanding
groove or scars in
workpiece.
1. Sandpaper grit too coarse.
2. Workpiece sanded across grain.
3. Workpiece pressure against sanding
abrasive too great.
4. Workpiece held too still against sanding
abrasive.
1. Use finer grit sandpaper.
2. Sand with the grain.
3. Reduce pressure applied to the workpiece against
the sanding abrasive.
4. Continuously move workpiece back-and-forth across
the sanding abrasive surface.
Abrasive grain rubs
off the sandpaper.
1. Sandpaper has been stored in an incorrect
environment.
2. Sandpaper has been folded or smashed.
1. Store sandpaper products away from extremely
cold or hot temperatures and in a dry, protected
location.
2. Store sanding sleeves or rolls so they are not
smashed or bent; store sandpaper sheets flat.
Sanding surfaces
clog quickly or burn.
1. Workpiece pressure against sanding
abrasive too great.
2. Sanding softwood or stock with high
residue.
1. Reduce pressure applied to the workpiece against
the sanding abrasive.
2. Use different stock or accept the characteristics of
the stock and plan on cleaning/replacing sandpaper
frequently.
Burn marks on
workpiece.
1. Sandpaper grit too fine.
2. Workpiece pressure against sanding
abrasive too great.
3. Workpiece held too still against sanding
abrasive.
1. Use coarser grit sandpaper.
2. Reduce pressure applied to the workpiece against
the sanding abrasive.
3. Continuously move workpiece back-and-forth across
the sanding abrasive surface.
Glazed surface on
workpiece.
1. Sanding wet stock.
2. Sanding stock with high residue.
1. Properly dry stock before sanding so moisture
content is less than 20%.
2. Use different stock or accept the characteristics of
the stock and plan on cleaning/replacing sandpaper
frequently.
W o r k p i e c e
frequently pulled out
of your hands.
1. Workpiece not correctly supported.
2. Engaging workpiece with the sander on a
leading corner.
3. Starting sander with workpiece against
sandpaper.
1. Hold workpiece firmly with both hands and engage
with sander slowly; use additional holding/supporting
devices for larger workpieces.
2. Start sanding workpiece on a trailing corner.
3. Start sander before engaging it with the workpiece.


