


Model H8192 1" Belt/8" Disc Combo Sander
-23-
Changing the
Sanding Belt
Some sanding belts are designed to sand in only
one direction and will have a direction indicated on
the back of the belt. The Model H8192 is designed
so that the sanding belt travels downward to the
sanding table.
To change the sanding belt:
1. DISCONNECT THE SANDER FROM
POWER!
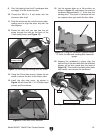
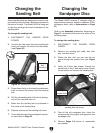
2. Unscrew the two knobs from the sanding belt
cover and remove the cover from the sander
(see Figure 32).
3. Press down firmly on the tracking adjustment
knob to remove the tension from the sanding
belt.
4. Roll the old sanding belt off the three pulleys,
and roll the new belt back on.
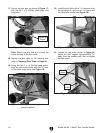
5. Make sure the sanding belt is positioned in
the center of all three pulleys.
6. Replace and secure the sanding belt cover.
7. Check and the adjust the sanding belt traction,
as instructed on
Page 22.
Changing the
Sandpaper Disc
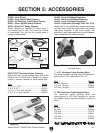
The Model H8192 accepts 8" diameter cloth or
paper-backed pressure sensitive adhesive (PSA)
sandpaper discs (refer to Accessories on Page
21).
Refer to the Assembly subsection, beginning on
Page 13
, for detailed instructions for some of the
following steps.
To change the sanding disc:
1. DISCONNECT THE SANDER FROM
POWER!
2. Remove the sanding disc table, disc dust
port, and dust cover.
3. Rotate the disc until you can see the set
screw through the access hole
(see Figure
33).
4. Using the 2.5mm hex wrench through the
access hole in the V-belt safety cover, loosen
the set screw and remove the sanding disc.
Figure 33. Location of access hole for the
sanding disc set screw.
Set Screw
Access Hole
5. Peel off the old sandpaper disc, clean the
aluminum disc thoroughly, and apply the new
sandpaper disc.
6. Reverse Steps 2–4 above to reassemble
your sander.
Figure 32. Sanding belt cover removed.
Sanding
Belt
Direction