


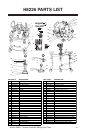


-9-Model H8226 5 Gallon Automatic Mixing Paint Tank
CLEANING AND LUBRICATION
3. Turn the tank regulator knob coun-
terclockwise until you no longer feel
spring tension.
4. Loosen the butterfly nuts on the tank lid
(Figure 4), tip the clamps back, and tilt
the tank lid to one side.
5. Loosen the spray gun air cap retaining
ring about three turns, then turn ON the
air supply.
6. Cover the cap with a cloth and pull
the trigger to force the material back
through the hose and into the tank.
7. Empty and clean the tank of all paint,
and fill it with solvent.
8. Replace the lid, tighten the clamps,
and spray the gun until it sprays clean
solvent.
Note: Check with local laws regarding
this practice. If you are spraying on a
regular basis, spraying solvents into
the air may be illegal. A cabinet style
spray gun cleaner may be required.
9. Use solvent to thoroughly rise all parts
that came in contact with the material,
then dry with compressed air or let air
dry.
10. Make sure all the fittings on the tank
and regulator, valve, and material hose
are free of hardened material that
could prevent free movement of air.
Proper
cleaning is the best way to ensure
trouble free performance from your paint
tank. If your tank is not thoroughly cleaned,
damage and poor operation will result.
Problems caused by improper cleaning will
not be covered by the warranty. Clean the
tank immediately after each use.
To clean your paint tank:
1. DISCONNECT AIR SUPPLY FROM
TANK!
EXPLOSION HAZARD! Removing the
lid while the tank is pressurized could
result in lid being thrown violently
from tank, causing serious personal
injury. Always shut off air pressure
at source and bleed off all pressure
in tank before removing lid.
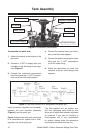
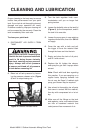
2. Bleed out all tank pressure by loosen-
ing the pressure release valve (Figure
4) until air stops hissing out.
Figure 4. Pressure Release Valve.
Pressure Release Valve
Clamp
Butterfly Nut