


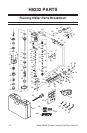
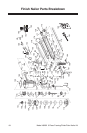

Model H8232 3-Piece Framing/Finish/Palm Nailer Kit
-12-
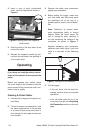
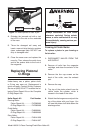
3. Locate the opening in the underside of
the nailer safety nose (see Figure 10).
Clearing Jammed
Nails
4. Dislodge the jammed nail with a tool
that will fit in the slot on the underside
of the nose.
5. Throw the damaged nail away and
insert a new nail strip that only contains
clean, undamaged nails. DO NOT use
dirty or damaged nails!
6. Release the catch lever and slowly
let the pusher slide to the front of the
magazine.
Finish Nailer
To clear a jammed nail from the dis-
charge area:
1. DISCONNECT NAILER FROM THE
AIR SUPPLY!
2. Pull back and latch the magazine push-
er, then remove the nail strip from the
magazine.
3. Open the nailer nose by removing the
rubber nose tip, squeezing the nose
release mechanism (see Figure 11),
and opening the nose cover.
Figure 10. Clearing a jammed nail.
Nose Opening
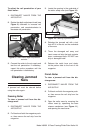
To adjust the nail penetration of your
finish nailer:
1. DISCONNECT NAILER FROM THE
AIR SUPPLY!
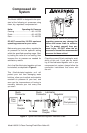
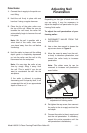
2. Rotate the depth adjustment knob (see
Figure 9) clockwise to increase nail
penetration, and counterclockwise to
decrease nail penetration.
Figure 9. Finish nailer depth adjustment
controls.
Safety Nose
Adjustment
Knob
3. Connect the nailer to the air supply and
test the nail penetration. If necessary,
repeat this entire procedure until the
nail penetration is satisfactory.
A jammed nail must be cleared before
using the nailer again.
Framing Nailer
To clear a jammed nail from the dis-
charge area:
1. DISCONNECT NAILER FROM THE
AIR SUPPLY!
2. Pull back and latch the magazine push-
er, then remove the nail strip from the
magazine.