


-10- G2891 Lathe Copy Attachment
4. Tighten the large cap screws securing the
mounting brackets to the lathe bed with the
large Allen
®
wrench provided. Then tighten
the hex nuts securing the Copy Attachment
Bed to the mounting brackets.
5. Once the brackets and bed are securely
attached, remove the gauge boards.
6. Install the longitudinal-feed handwheel.
This is the larger of the two handwheels. It
mounts on the shaft at the left hand end of
the Copy Attachment Bed. Secure the
wheel with the setscrew included.
7. Attach the crossfeed handwheel handle to
the smaller wheel on the the sliding car-
riage.
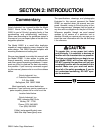
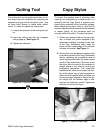
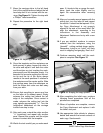
8. Install the cutting tool into the arbor and
tighten the collar setscrew. See Figure 5.
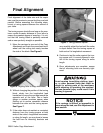
Once the Copy Attachment Bed is attached to
the mounting brackets, the following procedures
will allow you to begin the very important process
of aligning the parallelism between the centers of
the lathe and those of the centers which will hold
your template or original profile.
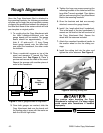
1. To roughly align the Copy Attachment with
the lathe headstock/tailstock axis two
gauge boards will be needed. The gauge
board should be approximately 1- 1
1
⁄8
''
thick, 6 - 8'' wide and 2 - 3'' long. Clamp
these gauge boards onto the lathe bed,
one under the headstock, the other under
the tailstock.
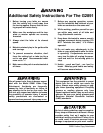
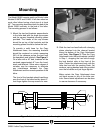
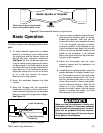
2. Place a machinist’s square on top of the
wood and measure 3'' toward the Copy
Attachment bed. See Figure 4. Place a
precise mark across the width of the wood.
Repeat the process with another piece of
wood at the headstock.
Rough Alignment
3"
Copy
Attachment
Bed
Figure 4. Use of gauge boards for alignment.
3. Once both gauges are marked, slide the
Copy Attachment bed over the board until
the leading edge is even with the marks on
both the left and right sides.
Use caution when handling the Copy
Attachment’s cutting tool. It’s sharp edges
could cause skin lacerations if handled
improperly.
Figure 5. Securing cutting tool.