


SKU 40134 Page 5
Installation
Caution: Installation should be completed by a qualified technician. Before at-
tempting installation of the Air Horns, remove the keys from the vehicle igni-
tion, and place wheel chocks on both sides of at least 2 wheels. Make sure
engine and engine compartment is cool before beginning work.
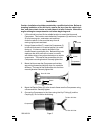
1. Lift the vehicle hood and find a suitable location to mount the Horns and
Compressor. This location must shelter the Compressor (3) and Horns (1 and
2) from incoming rain, road water, and mud from
under the vehicle. It also must be away from all
moving engine parts and heat.
2. Using a Screw and Nut (7), mount the Compressor (3)
to the vehicle chassis in a vertical position (air outlet
facing up). A hole may need to be drilled in the
chassis frame to accomplish this. Before drilling hole
make sure the drill’s path will not come in contact
with hidden wiring or any other obstructions or vehicle
components. The head of the screw slides into the
Compressor mounting bracket. Securely tighten Nut.
3. Mount the Horns near the Compressor so that they
are pointing forward and slightly down for maximum
efficiency. The head of the screw slides into the Horn
mounting bracket. Securely tighten Nut.
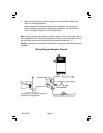
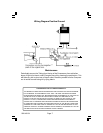
4. Mount the Electric Relay (5) to the chassis frame near the Compressor using
a Screw and Nut. Securely tighten.
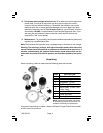
5. Connect the Compressor to the Horns using the Vinyl Tubing (4) and the
Coupling (6). Do not fold or kink tubing.
Air outlet
Compressor
To Horn Air Inlet
To Horn Air Inlet
Compressor
Horn Air Inlet
(8)
Screw
Nut
Nut
Screw