


Page 9SKU 03418 For technical questions, please call 1-800-444-3353.
9. When nished charging the battery, push the Function Switch to the Off position and
unplug the Power Cord (3) from the electrical outlet.
10. Disconnect the Cable Clamps from the battery.
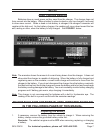
Ammeter Readings
The ammeter shows how much charging current is drawn from the charger (to the
battery). When a dead or low battery is charged the charger’s ammeter will register at the
high end. As the battery charges, the reading will move down toward the low end, resting
on zero, when the battery is fully charged. When using the battery in engine starting mode
(discussed further down this page) the needle on the ammeter will peg toward the high end
of the ammeter.
Do not depend on reading the ammeter to approximate how long charging will take.
Even at full charge the ammeter will still be providing as much as 50 percent of the charger’s
output rating. It’s best to monitor the battery’s charge. Sometimes, certain conditions such
as a cold battery, a sulfated battery, or a deeply discharged Lead Calcium battery (on many
newer cars) may cause the ammeter to read near a full charge, when the charging process
is only beginning.
Note: Cold batteries (at or below 32 degrees Fahrenheit) begin charging at a low rate and then
increase as the battery warms. When the battery charges up, the rate will decrease
at a normal rate. Do not charge a frozen battery.
SHORTED BATTERIES will read on the ammeter as a high end peg at the beginning of the
charging process. If after 5-10 minutes the needle does not move off of the high end, the
battery probably has a short circuit. Unplug the charger and discontinue use. Have the battery
checked by a qualied technician.
Engine Starting
Note: This charger’s high-current output can help start vehicles with weak batteries. Please
note that some of the newer vehicles with onboard computers may be damaged from this
process. Thoroughly read the vehicle owner’s manual before using this procedure.
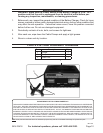
Connect the charger to the battery as discussed on pages 7 and 8, but leave the battery 1.
cables attached.
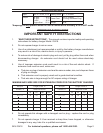
Set the charger to charge the battery for 5-10 minutes according to the appropriate 2.
charge rate for the size of the battery as explained on the previous 2 pages.
Set the select function switch (See 3. FIGURE 1 on page 6) to Start and the select switch
(see FIGURE 1 on page 6) to 55A.
Try to start the vehicle. If it doesn’t start in 2-3 minutes, stop and wait for the vehicle 4.
to charge for 5-10 minutes more and try again. Repeat this process until successful.
Note: If the engine continues to spin but will not start after several tries, than you may have
another problem unrelated to charging. Stop attempting to start/charge the battery
until the problem is found and corrected. Continued engine cranking may damage
the vehicle’s starter.