


Page 7SKU 34434 For technical questions, please call 1-800-444-3353.
REV 02/04
Feeding Stock:
CAUTION: You should always use the push blocks with every operation. You must use the push
blocks when working with stock that is less than 3” wide or thick.
CAUTION: Never feed with your hand on the end of the stock! Serious injury may result.
1. Always hold your stock rmly against the fence.
2. Always feed at an even rate along the entire length. Hesitations or stops will result in marred
and uneven nishes. Do not feed too fast.
3. Apply even pressure. Start feeding with your left hand forward and your right a couple
inches
behind. As your right hand passes over the blades, move your left hand behind the right. Continue
shifting in this fashion until all of your stock has been planed.
Bevel Planing:
1. Set the fence to the desired angle.
2. Move the fence in or out along the table to accommodate the desired planing width.
3. Plane along the edge of the stock. Make sure you are pushing the sock rmly against the
fence.
MAINTENANCE
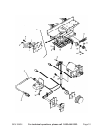
V-Belt Replacement:
1. Remove the Jointer Planer from the wooden base.
2. Remove the belt cover (29).
3. Turn the machine over. Remove the base screen (10) by unscrewing the six M4 x 12 screws
(8).
4. Remove the base (22) by removing the eight M5 x 30 screws (20). When lifting the base off,
be careful not to loosen any of the attached wires.
5. Remove the V-belt by simultaneously turning and pulling outward on it.
6. Install the new V-belt by simultaneously turning and pushing inward on it.
7. Reattach the base, screen and belt cover. Reattach the Jointer Planer to the wooden base.
Brush replacement:
1. Follow steps 1 - 4 as described in V-Belt Replacement (above).
2. Remove the two brush caps (57-8) and remove the brushes (57-7). If they are worn past the
indicator line, they must be replaced.
3. When installing the new brushes, guide the spring into the holder (57-6) and hold it in until the
cap is in position.
4. Reattach the base, screen and belt cover. Reattach the Jointer Planer to the wooden base.
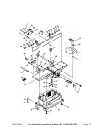
Fence Angle Adjustment Lever (52) adjustment:
If one of the Fence Angle Adjustment Levers (52) contacts the Fence (44) while tightening, preventing
it from fully tightening, perform the following steps:
1. Loosen the Tapping Screw (54) enough so that the Fence Angle Adjustment Lever can turn
without turning the Lock Bolt (46/51).
2. Turn the Fence Angle Adjustment Lever until it has enough room to travel to allow proper
operation.
3. Make sure the Fence Angle Adjustment Lever (52) is pressed against the Lock Bolt (46/51)
snugly. Tighten the Tapping Screw (54) securely. Test the fence for proper operation before use.