


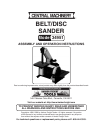

Page 8SKU 34951
For technical questions, please call 1-800-444-3353.
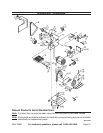
INSTALLING AND REMOVING SANDING BELTS
UNPLUG THE MACHINE FROM THE POWER SOURCE.
Unless it has already be taken off, remove the knob (1) from the top of the
sander. Remove the side cover (3).
Put the belt over the upper wheel (8) and large belt wheel (29).
Lift up on the belt tracking knob (19) and slide the belt over the lower belt
wheel.
Replace the cover.
ADJUSTING BELT TRACKING
The belt tracking adjustment was set at the factory, so the belt should run
true on its pulleys. If, however, the belt does run to one side or the other, or
if you’ve just installed a new belt, you can adjust the track using the tracking
knob (19).
Stand at the left side of the machine, on the far side from the “on/off’ switch.
Turn the tracking knob clockwise to move the belt away from you (your right
when standing in front). Turn the knob counterclockwise to move the belt
closer to you (your left from the front). This operation usually needs only a
very slight turn of the tracking knob.
USE OF THE BACKSTOP
The backstop (26) is made of heavy gauge steel to support the workpiece
you’re sanding. The backstop should be no more than 1/16” away from the
back of the sanding belt.
If the backstop needs adjustment, there are two bolts (24) and two washers
(25) which hold the backstop in place. To move the backstop closer to the
belt, simply loosen these and move the backstop.
For some operations, such as polishing or strapping, it’s advisable to remove
the backstop entirely by unscrewing the two bolts, two washers, and the
backstop itself.
1.
2.
3.
4.
5.
1.
2.
1.
2.
3.