


SKU 35149 For technical questions please call 1-800-444-3353. Page 9
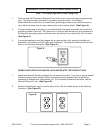
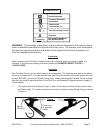
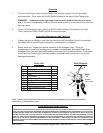
2. The Spring Clamp (1) can be mounted to the Bracket (7) at any of the three holes
located at the end of the Spring Clamp (1). Decide on the angle to attach the Spring
Clamp (1) to the Bracket (7) - see Figure 2. Thread in Phillips Head Bolt (5) through the
Bracket (7) and into the Spring Clamp (1). If the Phillips Head Bolt (5) does not thread in
tightly, you may have to add several washers (not included) to obtain a tight fit.
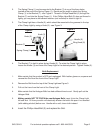
3. The Clamp Light has a Handle (2), which should be mounted to the grommet in the top
of the Clamp Light by using a Knob (3) - see Figure 3.
Bracket (7)
4. The Bracket (7) is held in place by two Knobs (3). To rotate the Clamp Light in place,
loosen the Knobs (3) and move the Clamp Light to the desired position. Tighten Knobs (3).
Bulb Replacement
1. Make certain that the product is OFF and unplugged. With leather gloves on, squeeze and
remove the Grid from the front of the Clamp Light.
2. Remove the Bolt from the top of the Clamp Light-see Figure 3.
3. Pull out the Lens from the front of the Clamp Light.
4. Make certain that the Halogen Bulb has had sufficient time to cool. Gently pull out the
Halogen Bulb.
5. Making certain NOT TO TOUCH the new Halogen Bulb, insert it into the Clamp Light
left side first. Oil from your skin will drastically shorten the bulb’s life-span if not cleaned
(with rubbing alcohol) before use. Handle with a soft, clean cloth instead.
6. Insert the Phillips Head Bolt (3) and replace the Grid.
Figure 2
Figure 3
Spring Clamp (1)
Knob (3)
Knob (3)
Handle (2)
Wing Knob (8)