


Page 4SKU 39213 For technical questions, please call 1-800-444-3353.
Note: Each Door is labeled indicating Right Door, Left Door, and Center Door.
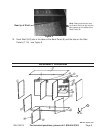
Loosely set the Top Panel (#1) in place on top of the assembly you nished in steps 6.
one (1) through ve (5) above. Make certain that the lip faces the front of the Hanging
Cabinet. Insert the Right Door (#11) into the holes in the Top and Bottom Panel. The
Doors are attached with pins which set into holes; make certain to lay the Washer
(hardware bag) over the pin prior to insertion. Insert the Center Door (#13) into the
holes in the Top and Bottom Panel. Repeat for the Left Door (#15).
Once the Doors are in place, attach the Top Panel (#1) to the assembly by inserting
7.
two (2) Bolts (#6) down into the Right Side Panel (#7) and two Bolts (#6) down into the
Left Side Panel (#16). Secure in place with Nuts (#5). Thread in remaining three (3)
Bolts (#6) through the Top Panel (#1) and into Center Panel 1(#2) and Center Panel 2
(#3), and into center Back Panel (#8). Secure with Nuts (#5).
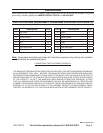
Figure 3-Center Panel
Figure 4-Inserting Lock
Key
Washers
Screw
Lever
Large Nut
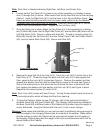
8. Remove the large Nut off of the Lock (#14). Force the Lock (#14) into the hole in the
Right Door (#11). Thread the large Nut back onto the Lock until it rests against the
Door, securing the Lock (#14) in place-see Figure 4. Remove the washer and star-
shaped lock washer from the Lock by loosening the screw on the end-see Figure 4.
Slip on the locking lever so that when the key is turned the lever is horizontal, and
then replace the washer and lock washer onto the Lock (#14)-see Figure 4 above.
Repeat for the remaining two (2) Locks (#14).
Note: Each Lock (#14) comes with two (2) keys. Turning the key should move the lever to
a horizontal position which will keep the Door from opening.
To hang the Cabinet, attach the two (2) Hangers (#4) to the right and left sides of 9.
the Back Panel (#8) with two (2) Bolts (#6). The Hangers (#4) should be attached to
the Back Panel (#8) at different ends of the Cabinet so that when hung the weight is
evenly distributed. Hang the Cabinet with the one (1) hole in each Hanger.
Warning: Make certain that the Bolt you use (not included) is sufciently strong enough to
hold the weight of the Hanging Cabinet and all contents of the cabinet. Make certain
that the surface to which the Cabinet will be mounted will support the full weight of
the Hanging Cabinet along with the weight of all tools and accessories which will be
placed inside of the Cabinet.
REV 01i, 03j