


SKU 40089 PAGE 3
UNPACKING
When unpacking, check to make sure all parts shown on the Parts List (page 4) are included. If any parts are
missing or broken, please call Harbor Freight Tools at the number shown on the cover of this manual as soon
as possible.
ASSEMBLY INSTRUCTIONS
NOTE: All parts below refer to the parts listed on page 4 of this manual.
Assembly
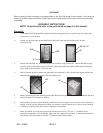
3. Starting with the Base (#1), fit the side panels over the Base, lining up the holes. Use the Bolt (#9) through
the holes. Secure with Washer (#8) and Nut (#7). Repeat with Side Panels (#2A & #2B). Attach Back Panel
(#5) to Side Panels and Base in the same way.
4. Slide in Shelves (larger on bottom and graduating up to smallest) (C & D). Secure each shelf with Bolts (#9),
Washers (#8) and Nuts (#7) to Side Panels and Back Panel.
5. Attach Top (#6) aligning with remaining holes. With Bolt (#9) through the holes, secure with Washer (#8) and
Nut (#7) through front and back of Cabinet.
6. Choose where you want to place Cabinet permanently. Anchor through holes in Base (#1) with hardware for
cement or wood flooring, depending on where you choose to mount Cabinet so it is secure during Grinding
or Buffing for a strong sturdy work surface. (Hardware not included.)
7. Attach your Buffer or Grinder through the 6 top mounting holes (3/8” H X 2-3/4” L). Hardware will be
required (not supplied). A non flammable rubber pad (not supplied) for insulation, is recommended between
the Cabinet Top and the Buffer or Grinder. This pad will help reduce vibration.
1. To assemble Steel Grinding/Buffing Cabinet with three storage shelves you must first lay out all parts and
hardware on a clean surface.
2. Identify the Top Shelf (#6), the two Side Panels (#2A, #2B, right and left), the Base (#1), and the
Back Panel (#5).
#2B
#2A
#1
#5
#9, #8, #7
#C
#6
#D