


Page 5 SKU # 41711
ASSEMBLY
Your Tile Cutter is mostly assembled when you receive it. Please complete the assembly as follows.
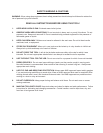
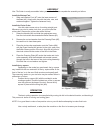
Install the Bottom Feet.
Slide each Bottom Foot (#T) onto the lower corners of 1.
the Base (#V). Attach each one with the bolts, nuts, and
washers supplied. Tighten the fasteners rmly.
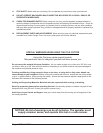
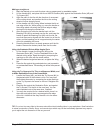
Install the Circle Cutter.
Your tile cutter comes set up for making straight cuts.
Whenever you wish to make circle cuts, you must install the
circle cutter. Remove the circle cutter when nished.
Raise the Handle (#H) and slide the mechanism away 1.
from the circle cutter area towards the Buffer Sleeves (#L).
Remove the nut and washer from the Pressing Plate (#E), 2.
be careful not to lose these parts.
Place the circle cutter mechanism onto the Tracks (#M) 3.
with the Press Handle (#A) pointed to the right, away from
the Buffer Sleeve portion of the tool. Align the drill point of
the circle cutter with the center of the hole in the Base.
Place the Pressing Plate (#E) under the tracks and circle 4.
cutter assembly, with the threaded rod inserted upward
through the hole in the base of the circle cutting assembly.
Re-install the nut and washer and tighten.
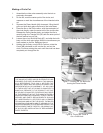
Install the try square.
Depending on the model you purchased, the try square
may install with the arm extension of the try square either to the
front of the tool, or to the rear. Both versions work equally well.
The measuring scales on your tool also may be marked either in
millimeters or inches.
1. Position the try square (#U) with the molded-in scale
markings upward. Place the slotted arm of the try square
over the guide on the base of the tool. Secure the try
square in place with the Wing Nut (#Q).
OPERATION
The basic cutting operation is accomplished by scoring the tile in the desired location, and breaking it.
This process is similar to scoring and cutting glass.
NOTE: It’s a good idea to make a few practice cuts on your tile before attempting to make nish cuts.
Use a sturdy workbench, or else place the machine on the oor to increase your leverage.
Figure 1. Foot Assembly.
Figure 2. Hole Cutter Assembly.