


Work Area
TO AVOID RISK OF PERSONAL INJURY, EQUIPMENT DAMAGE, FIRE AND SHOCK, MAKE SURE YOUR
WORK AREA IS:
Free of damp, wet or rainy conditions.
Free of children (never let them handle tools or machinery).
Well-lit.
Clean and uncluttered.
Before Using
Before using any tool, any part that appears damaged should be carefully checked to determine that it will
operate properly and perform its intended function.
Make sure all Nuts and Bolts are tight.
Use only Bench Grinders that are fully compatible with the Bench Grinder Pedestal Stand. The Bench Grinder
Pedestal Stand fits most Harbor Freight Tool Bench Grinders, but you should always check for sure before
using.
Use of the Pedestal Stand is for use with bench grinders only.
Assembly
Your Pedestal Stand will require assembly prior to use. It is important that you read the entire manual to
become familiar with the unit BEFORE you set up the Stand. Before assembling your Stand, be sure that you
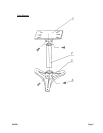
have all parts described in the Parts List and Parts Diagram on the last pages of this manual.
Set out all parts on a clear work surface prior to assembly.
Warning: Use only bench grinders that are fully compatible with the Bench Grinder Pedestal Stand.
Using bench grinders which do not fit this stand may result in harm or serious injury to the
operator. The Bench Grinder Pedestal Stand fits most Harbor Freight Tool Bench Grinders, but
you should always check for sure before using.
Use the Pedestal Stand for bench grinders only.
Step 1) The Base (#3) should be mounted to a heavy duty block of wood which is larger than the
Pedestal Stand Base, or into cement for safety and stability. A rubber mat should be placed
between the Base (#3) and the mounting surface to reduce vibration. The Mounting Holes on
the Base (#3) are 3/8" in diameter. Insert appropriate screws (not included) through the Base
(#3) and into a flat and secure surface. The mounting surface must be able to support the
weight of the Stand as well as the Grinder and work pieces during use.
Step 2) Insert the Column (#2) into the hole in the Base (#3). Insert a Bolt (#4) into each
hole in the Base (#3) and tighten them firmly against the Column (#2).
Step 3) Slide the Work Table (#1) into place on top of the Column (#1). Thread one Bolt (#4) through
each hole in the WorkTable. Tighten the Bolts (#4) until they are firmly against the Column.
#42986 Page 3