


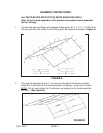
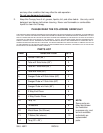

3. Drape the Tarp (part #14) over the assembled frame and secure the corners of the
Tarp onto the frame, by inserting the Tarp Ties (part #10) through the metal
eyelets of the Tarp and around the framing Tubes as shown in Figures C and D.
4. Once the corners are fastened, attach the remaining Ball Bungies through the rest
of the metal eyelets and onto the framing Tubes.
5. Lift one side of the roof and insert three Vertical Tubes (part #1) into the 3-Way End
Pieces (part #8) and 4-Way End Piece (part #9). When complete, do the same to
the other side. (See Figure C)
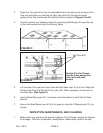
6. Insert a Metal Base (part #12, not shown) onto the bottom of each Vertical Tube
(part #1).
7. Secure the Metal Bases (part #12) to the ground, using the T-Stakes (part #13, not
shown).
INSPECTION, MAINTENANCE, AND CLEANING
1. Before each use, examine the general condition of the Canopy. Inspect the Canopy
for damage. Check for loose parts, misalignment, broken parts, tears in the tarp,
SKU 45211 PAGE 5
FIGURE C
FIGURE D
Caution: The Car Canopy
must be firmly secured on
a flat, level and solid
surface.
Tarp Ties (#10)