


Page 6
SKU 45725
Operation (continued)
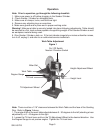
Refer to Figure 1 on page 5.
3. To adjust the height of the Work Table, loosen the Height Lock lever and turn the Height
Adjustment Wheel to the desired height. Tighten the Height Lock lever.
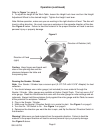
Note: Before operation, make sure you are working in the right direction of feed. The disc will
travel in either direction. You must move your workpiece in the opposite direction of the disc.
See Figure 2 below. Failure to feed the material in the proper direction will lead to serious
personal injury or property damage.
Figure 2
Direction of Rotation (left)
Direction of Feed
(right)
Running the Sander / Grinder
1. You should always use a miter gauge (not included) to move material through the
Sander / Grinder. Miter gauges are available at Harbor Freight Tools. This tool uses a 3/4”
miter gauge. Read the instructions that come with the miter gauge for miter settings and ad-
justments. Always hold the workpiece firmly against the miter gauge and the Table; be aware
of the potential for workpiece “kickback”.
2. Plug in the Sander / Grinder.
3. Make sure the Neutral / Direction Switch is in neutral to start. See Figure 1 on page 5
4. Turn the On / Off Switch to On. See Figure 1 on page 5.
5. Determine the direction you want the disc to spin, and flip the Neutral / Direction Switch in
that direction.
Warning! Make sure you feed material from the opposite direction. Failure to feed the
material in the proper direction will lead to serious personal injury or property damage.
See Figure 2 above.
Note: Your Sander / Grinder has a vacuum port (2-1/2” O.D. with 2-3/16” Adapter) for dust
collection.
Caution: Keep fingers and hands well
clear of the spinning disc and the
clearance between the table and
the spinning disc.