


SKU 46407 Page 4
Assembly
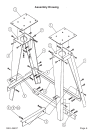
Refer to the Assembly Drawing on page 6.
Note: The only tool necessary is an adjustable wrench. It is advised to always
tighten hardware by hand until the unit is complete, then tighten with the
wrench.
Take a Base Plate (2) and attach a Leg A (3) to one side of it using four sets
of Bolts (7), Spring Washers (9), Flat Washers (8), and Nuts (10).
On the opposite side of the Base Plate (2), attach a Leg B (4) using a set of
Bolts (7), Spring Washers (9), Flat Washers (8), and Nuts (10).
Repeat this procedure with the other Base Plate (2) and Legs A&B (3&4) so
that you have two identical leg structures.
In the lowest holes of both Legs A&B (3&4) on one leg structure, attach a
Leg Mounting A (5) so that the holes match up and the angled lip is on top.
Secure with two sets of Bolts (7), Spring Washers (9), Flat Washers (8),
and Nuts (10).
Repeat same procedure with the other leg structure.
Next, you will join the two leg structures allowing the unit to stand. Lay the
units on a at, level surface so that the insides of both leg structures are
facing each other. Line up the two holes on a Leg Mounting B (6) with the
holes on the inside of one of the Legs A&B (3&4). Secure it with two sets of
Bolts (7), Spring Washers (9), Flat Washers (8), and Nuts (10). Take the
other end of the Leg Mounting B (6) bracket and attach it to the inside of
the corresponding Leg A&B (3&4) on the other leg structure using two sets
of Bolts (7), Spring Washers (9), Flat Washers (8), and Nuts (10).
Repeat the same procedure on the other two Legs A&B (3&4).
Stand up the unit.
Lastly, attach an Adapter Plate (1) to each Base Plate (2) using four sets of
Bolts (7), Spring Washers (9), Flat Washers (8), and Nuts (10).
The stand is ready for your lathe.
Operation
Note: Always use the stand on a at, level, dry surface. We recommend us-
ing two people to secure the lathe to the Lathe Stand.
When mounting a lathe onto the stand, rst make sure the mounting holes
on the stand correspond with the mounting holes on the lathe.
One person should hold the lathe so that the mounting holes line up, while
the other person puts one of the bolt, washer, nut combinations (not includ-
ed) through one of the holes in an Adapter Plate (1), and tighten by hand.
Next, attach one bolt, washer, nut combinations (not included) through one
of the holes on the other Adapter Plate (1). Tighten by hand.
Now, add the remaining hardware (not included) to secure all of the mount-
ing holes, and tighten with a wrench.
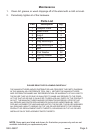
1.
2.
3.
4.
5.
6.
7.
8.
9.
1.
2.
3.