


SKU 47418 Page 4
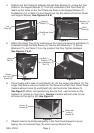
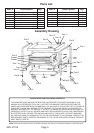
4. Position the Tool Chest (8) between the two Side Braces (3), resting the Tool
Chest on the Support Braces (7). From the underside of the Tool Chest (8)
match up the holes on the Tool Chest and those in the Support Braces (7).
Put Washer (14) on Bolt (15) and thread bolt into the bottom of the Tool Chest
and Support Braces.
See Figures A & B.
5. Attach the Upper Tray (2) by matching up the holes and securing with Bolts (1)
threaded through the Side Braces (3). Secure with Washers (11), Spring
Washers (12), and Nuts (13) on the inside of the Tray. Tighten hardware.
See Figures C & D .
Figure B
Support
Brace (7)
Tool
Chest (8)
Figure C
Side Brace
(3)
Tool
Chest (8)
(View from Underneath)
Washer (14)
Bolt (15)
Figure F
Figure E
Figure D
Bolt (1)
Washer (11)
Spring Washer (12)
Nut (13)
Upper
Tray (2)
Caster
with Lock (4)
Sheath (6)
Caster (5)
Sheath (6)
Caster with
Lock (4)
Sheath (6)
6. Place Caster with Locks (4) and Sheath (6) into the longer side Brace (3). The
longer Side Brace acts as a handle for the Service Cart with Tool Chest. Place
Casters without Locks (5) and Sheath (6) into the shorter Side Brace (3).
See Figure F.
(When not repositioning Service Cart, use the locks on the
Casters (4). Unlock to move Cart).
Caution:
Casters without Locks (5) can
still move to the right or left.
See Figure D.
7. Objects need to be distributed evenly in the Tool Chest drawers to avoid
tipping. Do not overload Trays (2) when moving Service Cart.