


Page 5For technical questions, please call 1-888-866-5797.Item 61565
Changing the Code
Note: The Safe comes preset with a code of
1. Follow the instructions for opening
the Safe to open the door.
2. Make sure that the Key is available
before changing the code.
3. Keep door open during the entire procedure
of changing the code.
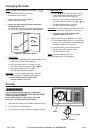
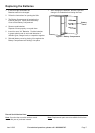
On the inside of the Door near the hinge, there is
the small, red, Code Reset Button. See Figure D.
Code
Reset
Button
Figure D: Code Reset Button
4. USER CODE:
a. Press the Code Reset Button until the Yellow Light
on the Front Control Panel lights up.
b. Input your new Code (3 to 8 digits) into the
Key Pad, followed by either the or Key.
c. The Safe will beep twice to confirm
that the Code has been changed.
Important: If the Safe beeps three times, the code
has not been accepted. Repeat the steps above.
d. Leave the door open until the code
has been tested, see below.
5. MASTER CODE:
a. Press on the Key Pad and press the
Code Reset Button until the Yellow Light
on the Front Control Panel lights up.
b. Input your new Code (3 to 8 digits) into the
Key Pad, followed by either the or Key.
c. The Safe will beep twice to confirm
that the Code has been changed.
Important: If the Safe beeps three times, the code
has not been accepted. Repeat the steps above.
d. Leave the door open until the code
has been tested, see below.
6. With the door still open, TEST the new code:
a. First extend the door lock latch to the locked
position by turning Handle counterclockwise
and then turning Knob clockwise.
b. Once the latch is in the locked position,
use the new code to open the latch
and ensure that it works.
Note: If desired, make a note of the
new Code and store it in a safe place.
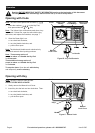
Closing
Keep closed and locked whenever unattended.
RISK OF CHILD ENTRAPMENT AND SUFFOCATION.
Check inside before closing.
Do not allow children to play with or near safe.
Keep keys and codes away from children.
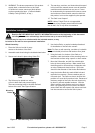
1. Close the door and turn the Handle counterclockwise.
2. Turn the Knob counterclockwise.
3. Pull on the door to make certain it is properly locked.
Knob
Handle
Figure E: Closing