


Page 7For technical questions, please call 1-800-444-3353.SKU 68239
Operating Instructions
Read the ENTIRE IMPORTANT SAFETY
INFORMATION section at the beginning
of this manual including all text
under subheadings therein before
set up or use of this product.
Tool Set Up
TO PREVENT SERIOUS INJURY FROM
ACCIDENTAL OPERATION:
Unlock and release the Trigger and disconnect Battery
Pack before adjusting tool or installing accessories.
Charging
1. Place the Battery Pack on a dry reproof surface in
a room where the temperature is from 50–104° F.
Note: If recharging a newly spent Battery Pack, allow it to
cool completely before charging.
Make sure the Battery Pack is undamaged; do
not charge a cracked or leaking battery pack.
2. Disconnect the Cord from the Battery Charger. Attach
the Adapter plug to a grounded, 120 V~, 60 Hz outlet.
3. Plug the Charger into the power supply and
the green charging light will activate, showing
that power is supplied to the Charger.
4. Slide the Battery Pack onto the Charger’s base.
The red charging indicator light will activate
to show that charging is taking place.
Note: The Battery Pack’s capacity will increase
somewhat during the rst few charging cycles. A fully
discharged battery will take about 3 to 5 hours to fully
charge. CAUTION! Recharging the Battery Pack for
more than 5 hours can damage the battery cells.
5. While charging, the Battery Pack and Charger,
and Adapter may become warm to the touch. This
is normal, and does not indicate a problem.
6. Unplug the Charger and disconnect it from
the Battery Pack when nished.
7. Allow the Battery Pack to cool
completely before using it.
8. Press the Battery Button to release Battery Pack from
the Charger (or when removing it from the Drill).
9. Store the Charger and Battery Pack indoors, out
of reach of children. WARNING! Do NOT use a
different Charger or Battery to power this Drill.
General Operating Instructions
TO PREVENT SERIOUS INJURY FROM
ACCIDENTAL OPERATION:
Always make sure the Trigger Switch of the Cordless
drill is in its “OFF” position, the Battery Pack is
disconnected from the Drill, and the Direction Switch
is centered in its mid-position (which locks the Trigger)
prior to making any adjustments to the tool.
• DO NOT install the Battery Pack until
AFTER you complete the following
steps to set up the Drill for use.
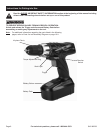
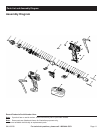
• Refer to page 6 for the location of the parts
of the Drill for the following steps.
1. The Drill is designed to accept up to 3/8” standard drill
bits. Do not use larger drill bits in this Drill as damage
to the gears and/or motor may result. Always use a
drill bit that is designed for the specic drilling job.
2. To “lock” the trigger mechanism as a safety
measure, press down the Direction Switch
so that it is in the “center” position. This will
prevent the drill turning on accidentally.
3. While holding the ring behind the collar of
the chuck with one hand, rotate the collar of
the Chuck counterclockwise, if needed, and
place the desired drill bit or screw driver bit
into the drill between the Chuck Jaws.
4. Hand tighten the Chuck until the bit is held securely in
place, centered between the Chuck Jaws.
5. Set the desired torque setting by rotating the
Torque Adjustment Ring to desire setting.
a. The numbered speed settings from 1 to 20
are for driving screws, bolts and nuts.
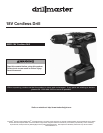
Keyless Chuck
Torque Adjustment Ring