


SKU 90399 For technical questions, please call 1-800-444-3353. Page 7
PLEASE READ THE FOLLOWING CAREFULLY
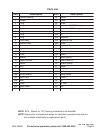
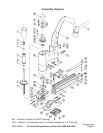
THE MANUFACTURER AND/OR DISTRIBUTOR HAS PROVIDED THE PARTS DIAGRAM IN THIS MANUAL
AS A REFERENCE TOOL ONLY. NEITHER THE MANUFACTURER NOR DISTRIBUTOR MAKES ANY
REPRESENTATION OR WARRANTY OF ANY KIND TO THE BUYER THAT HE OR SHE IS QUALIFIED TO
MAKE ANY REPAIRS TO THE PRODUCT OR THAT HE OR SHE IS QUALIFIED TO REPLACE ANY PARTS
OF THE PRODUCT. IN FACT, THE MANUFACTURER AND/OR DISTRIBUTOR EXPRESSLY STATES THAT
ALL REPAIRS AND PARTS REPLACEMENTS SHOULD BE UNDERTAKEN BY CERTIFIED AND LICENSED
TECHNICIANS AND NOT BY THE BUYER. THE BUYER ASSUMES ALL RISK AND LIABILITY ARISING
OUT OF HIS OR HER REPAIRS TO THE ORIGINAL PRODUCT OR REPLACEMENT PARTS THERETO, OR
ARISING OUT OF HIS OR HER INSTALLATION OF REPLACEMENT PARTS THERETO.
Maintenance
1. Periodically lubricate all moving parts and pivots with a light oil.
2. Wipe down the Floor Stapler with a damp cloth. Do not use harsh detergents or sol-
vents.
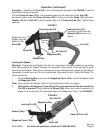
3. Check that the Shoe (28) and the Hammer Face (10) is clear of any dirt or debris.
Anytime
any
maintenance or repairs are done (including clearing jams), FIRST:
1. Disconnect the Stapler from the air hose.
2. Empty Magazine (30a) completely.
3. Attempt to fire the Stapler into a piece of scrap wood to ensure that it is disconnected
and is incapable of firing any staples.
4. Always leave Magazine Cover (33a) open during maintenance. The Magazine is
spring-loaded and may cause parts or a staple to fly out of the Stapler.
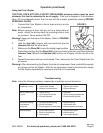
Clearing Jams
1. Disconnect tool from air hose, empty Magazine (30a) of staples, release any built-up
air pressure, and leave the magazine open, as explained above.
2. While doing this step and the next, hold the Stapler pointed away from you and any
other people or fragile objects. Remove all four Screws (11) and Washers (23a) on the
Driver Guide (22a).
3. Carefully lift the Driver Guide (22a) off and remove the jammed staple. Pliers may be
necessary to remove a stuck staple.
5. Inspect the driver on the end of the Piston Assembly (9) for bends or breakage. If it is
damaged, do not use the tool until it is repaired by a qualified technician.
6. Lightly oil the driver and replace the Driver Guide (22a). Replace and securely tighten
all of the Screws (11) and Washers (23a).
7. Reload the Stapler.
8. Reconnect the Stapler to the air hose.
9. Press the tip of the Stapler against an appropriate piece of scrap wood.
10. Test fire the Stapler several times, checking for proper operation.
11. Disconnect the Stapler, remove the staples, and store the Stapler in a location out of
children’s reach.
REV 11/04