


SKU 90980 Page 3
12. Make certain to switch the Laser Level to the “OFF” position when adjusting or when
changing the batteries.
13. Use the right tool for the job. There are certain applications for which this tool was designed. Do
not modify this tool and do not use this tool for a purpose for which it was not intended.
14. Remove batteries if the Laser Level is not used for a long period of time.
15. Do not operate tool if under the influence of alcohol or drugs. Read warning labels on
prescriptions to determine if your judgment or reflexes are impaired while taking drugs. If there is
any doubt, do not operate the tool.
Note: Always switch to a fresh battery when tool performance begins to diminish. This is a
delicate instrument, do not drop or jar the Laser Level.
Warning: The warnings, cautions, and instructions discussed in this instruction manual cannot
cover all possible conditions and situations that may occur. It must be understood by
the operator that common sense and caution are factors which cannot be built into this
product, but must be supplied by the operator.
Assembly/ Operation
Your Laser Level will require some assembly prior to use. It is important that you read the entire
manual to become familiar with the product BEFORE you use the Laser Level. Before assembling and
operating the Laser Level be sure that you have all parts described in the
Parts List and Assembly
Diagram
located on the last pages of this manual.
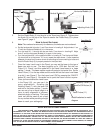
1. Unfold the Tripod (15) by pulling out on the Tripod arms. Turn the Knob (17) to lock the arms in
place-see
Figure 1.
2. The legs of the Tripod (15) can be raised or lowered by lifting the latch on the body of the Tripod
(15) and sliding the leg in or out to the desired height-see
Figure 1
. Push the latch down into
place to secure the Leg into position. Repeat for the remaining two legs.
3. Set the Tripod on a flat surface. Once the Tripod (15) is set up, you can raise and lower the
Rotating Head (7) by turning the Handle (18) located at the top of the Tripod (15) -see
Figure 3
.
Wind the Handle (18) clockwise to raise the Rotating Head (7) and counterclockwise to lower the
Rotating Head (7) -see
Figure 3.
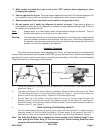
4. Initial Leveling of the Rotating Head (7):
Turn the three Adjusting Knobs (16) one at a time to level the Rotating Head (7). Keep turning the
Adjusting Knobs (16) until the Bulls-Eye Bubble (19) floats exactly in the center of the circle. If
you are out of level, the air bubble will float to the side of the Bulls-Eye Bubble-see
Figure 4.
Note: The Bulls-Eye Bubble (19) is intended for initial leveling of the Rotating Head (7) only.
After placing the Plastic Body (5) into the tripod slot, further leveling should be done
using the Horizontal Bubble (4) as a reference.
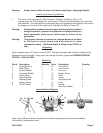
Figure 2
Tripod slot
Knob (14)
Plastic Body (5)
leg of
Tripod (15)
Figure 1
Knob (17)
latch
arms
REV 03/04