


Page 6
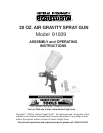
SKU 91009
Operation (continued)
Note: Before spraying, mask all objects you do not want sprayed and lay cloths (not included)
on the floors.
Operation
Note: We recommend you practice on scrap material to adjust and get familiar with the Gun.
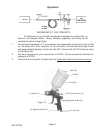
1. Connect the air source hose to the Air Inlet (32). Turn on your air compressor to the
recommended air pressure of 40 PSI. Do not exceed the 50 PSI maximum.
2. Pull the Trigger (36) slowly and move the Spray Gun in parallel strokes to the object
being painted. Keep the distance from the object being painted at 4” to 12”. This may
slightly differ depending on the flow adjustment and the material being sprayed.
3. Release the Trigger (36) after each forward movement; pull the Trigger (36) again on the
return movement.
4. When using a vertical pattern, move the Spray Gun in a horizontal motion; with a
horizontal pattern move the Spray Gun in a vertical motion. A round pattern requires a
greater distance from the object being painted.
5. When finished, release the Trigger (36) and disconnect from the air source. The Cup
(28) and Spray Gun may still hold air pressure, fire the Spray Gun toward scrap material
until all of the pressure is expended. Before removing the Lid (29), open the Vent (30).
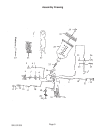
Spray Gun Adjustments (Refer to page 5 and the Assembly Drawing on page 9)
Note: We recommend you practice on scrap material to learn the fine tune adjustments.
1. To change the spray pattern, turn the Spray Regulating Knob (20) and/or adjust the Air
Nozzle (1).
2. To regulate the amount of material entering the Spray Gun, adjust the Fluid Control
Knob (12).
3. To fine tune the air flow, adjust the Air Adjusting Valve (31).
Filling the Cup (28)
Warning! The Spray Gun must be disconnected from the air source when filling or refilling
material.
1. Attach the Cup (28) to the Spray Gun. Make sure to include the Filter (27) in between
the Cup (28) and Gun Body (8) during assembly.
2. Remove the Lid (29) off the top of the Cup (28) of the Spray Gun.
3. Fill the Cup (28) with the appropriate material and replace the Lid (29) on the top of the
Cup (28). Make sure the Lid (29) is securely tightened. Make sure the Vent (30) is
closed.