


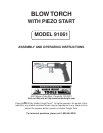


ASSEMBLY AND OPERATING INSTRUCTIONS
NOTE: For additional references to the parts listed in the following pages, refer to the
Assembly Diagram (page 8).
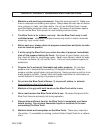
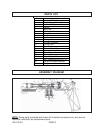
1. Make sure the Thumb Wheel (7) is turned completely clockwise to the “OFF”
position. (See Figure A.)
2. Screw the 16.4 ounce propane bottle (not included) tightly onto the Cylinder
Connector (11). Do not remove the propane bottle until it is completely empty.
3. The Thumb Wheel (7) regulates the propane gas flow. Release the propane gas
flow by slightly turning the Hand Wheel counterclockwise. (See Figure A.)
4. Make sure the Burner (1) is pointing in a safe direction and, with the Blow Torch
in a vertical position, push the Piezo Button (16) to activate the electric start. It
may be necessary to push the Piezo Button several times to activate the flame.
(See Figure A.)
5. Adjust the flame to the desired level by turning the Thumb Wheel (7)
counterclockwise. (See Figure A.)
6. NOTE: The lit Blow Torch should operate with a blue flame with a small yellow
tip. If necessary, adjust the Thumb Wheel (7) if there is sputtering or popping.
(See Figure A.)
PRODUCT FEATURES
1. The Blow Torch is ideal for sweating and thawing pipes, soldering, and
burning weeds in a well controlled safe environment. In addition, the Blow Torch
easily attaches to standard 16.4 Oz. (465 g) (1.02 Lb.) propane tanks.
SKU 91061 PAGE 6
THUMB WHEEL (7)
PIEZO BUTTON (16)
BURNER (1)
CYLINDER CONNECTOR (11)
FIGURE A