


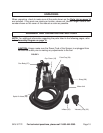


SKU 91772 For technical questions, please call 1-800-444-3353. Page 13
INSPECTION, MAINTENANCE, AND CLEANING
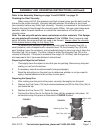
1. WARNING! Make sure the Power Switch (31) of the Motor Unit is in its
“OFF” position and that the tool is unplugged from its electrical outlet before
performing any inspection, maintenance, or cleaning procedures.
2. BEFORE EACH USE, inspect the general condition of the Sprayer. Check for
loose screws, misalignment or binding of moving parts, cracked or broken parts,
damaged electrical wiring, and any other condition that may affect its safe opera-
tion. If abnormal noise or vibration occurs, have the problem corrected before
further use.
Do not use damaged equipment.
3. After each use, clean the gun immediately. Open the Cup Cover (19) and
remove the Paint Cup (24). Replace left over paint in its container and seal the
container. Pour small amounts of thinner into the Paint Cup (24) and replace the
Cup Cover (19). Fire the Spray Gun into a paint waste receptacle until the thin-
ner comes out completely clean. Repeat if necessary. Clean off any trace of
paint from the Spray Gun. Clean off the Gasket (20) that is under the Cup Cover
(19).
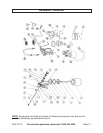
4. Clean the Fluid Nozzle (15) and the Fluid Needle (4). First, unlock and remove
the Lock Ring (17), and Fluid Tip (16). Completely loosen the Fluid Needle Screw
(1). Remove the Needle Spring (2) and push out the Fluid Needle (4). Do not
use tools as they will bend the part. Put the parts in a container with thinner and
clean them. Replace them in the proper order. Refer to the Assembly Drawing
on page 15.
5. Run water through the Spiral Air Hose (46) making sure it is clean inside. Discon-
nect the Spiral Air Hose from spray gun or inflator and the motor unit, then allow it
to dry before reassembly.
6. Make sure the Gasket (20) on the Paint Cup (24) is not torn or broken. If it is,
replace it immediately. Always make sure the Gasket (20) is on correctly.
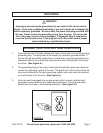
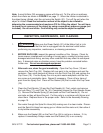
Note: A small Inflator (32) accessory comes with this unit. To fill a raft or air mattress,
attach the inflator as shown in FIGURE 2 on page 11. When the inflator is attached to
the object being inflated, start the unit using the Switch (31). Turn off the unit when the
object is inflated. Read the instruction manual of the object to be inflated to
determine the recommended and maximum PSI for filling the object. You will have
to check the air pressure of the object by using a separate air pressure gauge (not
included). Do not overinflate. Overinflating may cause the object to explode.