


Page 11For technical questions, please call 1-800-444-3353.SKU 91773
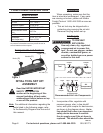
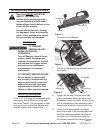
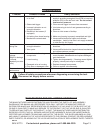
make sure the sandpaper is taut. Hold in
place with the screwdriver and lower the
tension bar.
To remove the sandpaper, pull up on
the tension bar at each end of the Inline
Sander and pull out the sandpaper.
Work Piece and Work Area Set Up
Designate a work area that is clean and 1.
well-lit. The work area must not allow
access by children or pets to prevent
distraction and injury.
Route the air hose along a safe path to 2.
reach the work area without creating a
tripping hazard or exposing the air hose
to possible damage. The air hose must
be long enough to reach the work area
with enough extra length to allow free
movement while working.
Secure loose workpieces using a vise 3.
or clamps (not included) to prevent
movement while working.
There must not be hazardous objects 4.
(such as utility lines or foreign objects)
nearby that will present a hazard while
working.
General Operating Instructions
Identify the area you will be sanding. 1.
Make sure you are using the appropriate
grit sandpaper for the job. Clear any
objects from the area you will be
sanding.
Install a sheet of sandpaper onto the 2.
Sander
Connect the Sander to the air 3.
compressor’s hose. If leaking is
detected, disconnect the air hose and
repair before use.
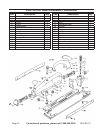
Firmly grip the Handle (27) with one 4.
hand and the Knob (22) your other hand.
Depress the Trigger (26) before making 5.
contact with the work surface to ensure
the Inline Sander does not jump from
your hands.
Move the Inline Sander along the work 6.
surface in a smooth steady motion. Do
not stay in any one area for more than a
few seconds at a time. Sand in random
directions to avoid sanding a pattern into
your work surface.
Do not put too much pressure on the 7.
Inline Sander while you are sanding.
Let the weight of the tool do the work
for you. If the Inline Sander stalls while
you are using it, release the Trigger
immediately.
If the tool requires more force to 8.
accomplish the task, verify that the
tool receives sufcient, unobstructed
airow (CFM) and increase the pressure
(PSI) output of the regulator up to the
maximum air pressure rating of this tool
(90 PSI).
CAUTION! TO PREVENT TOOL AND
ACCESSORY FAILURE, RESULTING
IN INJURY:
Do not exceed the tool’s maximum air
pressure rating.
To prevent accidents, turn off the tool, 9.
detach the air supply, safely discharge
any residual air pressure in the tool,
and release the throttle and/or turn the
switch to its off position after use. Clean
external surfaces of the tool with clean,
dry cloth, and apply a thin coat of tool
oil. Then store the tool indoors out of
children’s reach.
REV 10f