


13. WARNING! People with pacemakers should consult their physician(s)
before using this product. Electromagnetic fields in close proximity to a heart
pacemaker could cause interference or failure of the pacemaker. In addition,
people with pacemakers should adhere to the following: Avoid operating power
tools alone. Don’t use a power tool with the power switch locked on. Properly
maintain and inspect all tools before use to avoid electrical shock.
14. WARNING! The warnings, precautions, and instructions discussed in this
manual cannot cover all possible conditions and situations that may occur. The
operator must understand that common sense and caution are factors which
cannot be built into this product, but must be supplied by the operator.
generated, the faster the Battery Pack loses power. A Battery Pack that gets too
hot can be permanently damaged. Never over-discharge a Battery Pack by
using the tool while tool performance is decreasing. Never attempt to discharge
a tool’s Battery Pack by continuing to squeeze the tool Switch (18). When tool
performance begins to diminish, stop the tool, re-charge the Battery Pack, and
use the fresh Battery Pack for optimal performance.
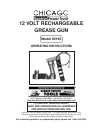
SKU 92196 For technical questions, please call 1-800-444-3353 PAGE 6
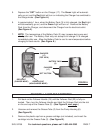
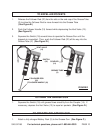
TO CHARGE THE BATTERY PACK
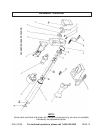
NOTE: For additional information regarding the parts listed in the following pages, refer
to the Assembly Diagram on page 13.
1. NOTE: The Battery Pack (3) requires charging. The first charge requires 1 hour
charge time prior to using the Grease Gun. (See Figure A, next page.)
2. When the Battery Pack (3) requires re-charging, a 1 hour charge allows the tool
to operate at full power. Do not re-charge the Battery Pack longer than 1 hour,
as damage to the Battery Pack and/or Charger (17) will occur.
(See Figure A.)
SAVE THESE INSTRUCTIONS
3. Insert the Battery Pack (3) into the Charging Socket of the Charger. Then, plug
the Charger (17) into the nearest 120 volt, grounded, electrical outlet.
(See Figure A.)
4. The Green Light on the Charger (17) will automatically turn on. (See Figure A.)