


English
Page 11
SKU 92623
For technical questions, please call 1-800-444-3353
INSPECTION, MAINTENANCE, AND CLEANING
WARNING! Make sure the Power Switch of the Polisher/Sander is in its “OFF” posi-
tion and that the tool is unplugged from its electrical outlet before performing any
inspection, maintenance, or cleaning procedures.
1. Before each use, inspect the general condition of the Polisher/Sander. Check for loose
screws, misalignment or binding of moving parts, cracked or broken parts, damaged
electrical wiring, and any other condition that may affect its safe operation. If abnormal
noise or vibration occurs, have the problem corrected before further use. Do not use
damaged equipment.
2. Periodically recheck all nuts, bolts, and screws for tightness.
3. Store in a clean and dry location.
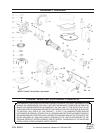
4. The most common error when waxing/polishing a vehicle is applying too much wax. If
the Foam Pad (44) becomes saturated with wax, polishing will be more difficult and will
take longer. Applying too much wax may also reduce the life of the Foam Pad. If the
Foam Pad continually comes off the Polishing Pad (2) during use, too much wax may
have been applied.
Sanding
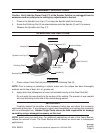
1. Attach the desired grit Sanding Disk (47 or 48) onto the Polishing Pad (2).
2. Plug the Power Cord (41) of the Polisher/Sander into the electrical extension cord. Then,
plug the extension cord into the grounded, GFCI, 120 volt, electrical outlet.
3. Identify the area you wish to sand. Make sure the power cord will reach that far without
stressing any connections. Place the Polisher/Sander onto the sanding area.
4. To start, grip the Polisher/Sander firmly with both hands and press in on the Switch (36)
trigger. Press the Lock-on Button to lock the Switch in the On position. Press in on the
Switch to unlock again.
5. Position the unit on the area to be sanded, select the desired speed by rotating the Speed
Adjustment (37) knob (1 through 6), and allow the Sanding Disk (1) to rotate until it has
reached that speed. Keep heavy pressure off of the Polisher/Sander when operating.
Allow the sanding disk to do the work.
6. Move the Polisher/Sander in a uniform pattern up and down or side to side as you sand
to ensure even sanding.
7. Periodically, stop the Polisher/Sander and check for possible disc wear. Replace used or
worn sanding discs when necessary.
8. When finished, release the Switch (6) to its Off position. Then unplug the Power Cord
(41) from the electrical extension cord. Unplug the extension cord from the electrical
outlet.