


SKU 92775 For technical questions, please call 1-800-444-3353 PAGE 11
OPERATING INSTRUCTIONS
To Charge A Battery:
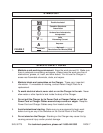
9. 3 AMP Fuse (9): The 3 AMP Fuse is located on the rear panel of the Battery
Charger. In the event the Power On (2) feature on any of the six separate cir
cuits
does not
illuminate, turn Power Switch(es) (6) to the “OFF” positions and
unplug the Battery Charger from its electrical outlet. Temporarily remove the
Fuse Cap. Pull out and remove the 3 AMP Fuse to check for a melted wire
strand within the Fuse. If necessary, insert a new 3 AMP Fuse into the Fuse
Holder. Then replace the Fuse Cap. Plug the Power Cord of the Battery Charger
into its electrical outlet, and turn the Power Switch(es) to the “ON” position to
resume battery charging.
1. The Battery Charger features
six
separate circuits that allow the unit to charge up
to
six
batteries at once.
2. To charge a battery, pull out the sliding Shelf on the Battery Charger, and place
the battery on the Shelf. Connect the Charger Clamps (7) as discussed in
Step #7,
page 10
.
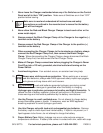
3. Set the Current Selector (1) to the appropriate amperage (0.25, 0.50, or 0.90
AMPs). (See Figure D.)
4. Plug the Power Cord of the Battery Charger into the nearest 120 volt, grounded,
electrical outlet.
5. Turn the Power Switch (6) (for the circuit you are using) to its “ON” position.
(See Figure D.)
6. When illuminated, the Battery Charged (4) feature will indicate the battery is fully
charged. (See Figure D.)
7. Once the battery is fully charged, turn off the Power Switch (6). Unplug the
Battery Charger from its electrical outlet. Then disconnect the Charger Clamps
(7) as discussed in Step #7,
page 10.
(See Figure D.)
8. When finished using the Battery Charger, make sure to store the Battery Charger
in a clean, dry, safe location out of reach of children and other unauthorized
people.