


Page 8 For technical questions, please call 1-800-444-3353. SKU 92857
Operating Instructions
Read the ENTIRE IMPORTANT
SAFETY INFORMATION section at the
beginning of this manual including
all text under subheadings therein
before set up or use of this product.
Inspect tool before use, looking
for damaged, loose, and missing
parts. If any problems are found,
do not use tool until repaired.
Tool Set Up
TO PREVENT SERIOUS INJURY FROM
ACCIDENTAL OPERATION:
Detach the air supply and safely discharge any
residual air pressure in the tool before performing
any inspection, maintenance, or cleaning procedures.
TO PREVENT SERIOUS INJURY:
Do not adjust or tamper with any control or
component in a way not specically explained
within this manual. Improper adjustment can
result in tool failure or other serious hazards.
Work Piece and
Work Area Set Up
1. Designate a work area that is clean and well-lit.
The work area must not allow access by children
or pets to prevent distraction and injury.
2. Route the air hose along a safe route to reach
the work area without creating a tripping hazard
or exposing the air hose to possible damage.
The air hose must be long enough to reach
the work area with enough extra length to
allow free movement while working.
3. There must not be hazardous objects (such
as utility lines or foreign objects) nearby that
will present a hazard while working.
CAUTION! Prior to sandblasting, protect other
people (and property) in the work area from
ying debris by providing barriers or shields.
Always wear appropriate clothing and safety
gear when operating the Abrasive Blast Gun.
General Operating Instructions
1. If possible, place the workpiece inside a sandblast
cabinet (not included). Otherwise, isolate the
workpiece to make sure no damage can occur to
nearby walls, tools, equipment, or other property.
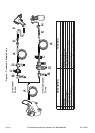
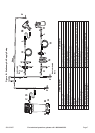
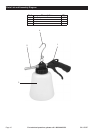
2. Fill the Container (3) with 1 liter of clean, dry blasting
media. Walnut Shells (SKU 92155 and 92150)
or aluminum oxide (SKU 99945) are available at
Harbor Freight Tools. WARNING! Do not use sand
as blasting media as sand may clog blast gun and
damage the nozzle. Do not reuse blasting media.
3. Place the Gun Body (1) on top of the Container and
turn clockwise until fastened securely.
NOTE: To keep the beads from accidentally spilling
out, do not point the Gun Body downward.
4. Connect the compressor’s air hose to the Gun
Body. Turn the compressor’s regulator to between
90-145 PSI. WARNING! Do not exceed 145 PSI.
5. Turn on the compressor and grip the Blast Gun rmly
with both hands.
NOTE: Test the spray pattern and intensity of
the Blast Gun on a piece of scrap material.
6. Aim the Gun Body toward the object that
is to be sandblasted. Then squeeze the
trigger to turn on the Blast Gun.
7. Adjust the ow of abrasive media by
turning the knurled adjustment ring on the
nozzle. Turn clockwise to reduce ow and
counterclockwise to increase ow.
8. Use the Hook (4) to hang the Blast Gun
during use, if desired. WARNING! Do not
leave Blast Gun hanging unattended.
9. To rell the Container, release pressure on the
trigger. Turn off the air compressor and squeeze
the Trigger once again to release any compressed
air. Then twist off Container and rell.
10. When nished using the Blast Gun, release pressure
on the trigger. Turn off the air compressor. Squeeze
the trigger once to release any compressed air.
Disconnect the Blast Gun from its air supply.
NOTE: Always dispose of used abrasive bead
media according to local solid waste guidelines.
11. Clean, then store the tool indoors
out of children’s reach.